Author: Nicole

  • Buttercup Cakelet Pan

    Buttercup Cakelet Pan

    If you like flowers, you cannot beat this Buttercup Cakelet Pan for cuteness. The hard-annodized aluminum pan is made by Nordicware, is very durable, and also has a nice nonstick finish to make it easy to slide out the flower-shaped cakes. You can easily dress them up with a little icing, but these look great on their own or with a simple dusting of confectioners’ sugar.

    No matter how you decorate them, a “bouquet” of these arranged on a platter would make a fantastic presentation for a spring or summer dessert. One easy way to dress them up would be to start with a vanilla or white cake recipe (a favorite cupcake recipe) and adding some lightly colored food coloring to it, then marbeling pink, yellow, purple and white batters into the cups for cakes that definitely need no further embellishment.

  • Martha Stewart’s Cupcakes

    Martha Stewart’s CupcakesThere are plenty of cupcake books out there, but most of them seem to focus on decorating the cupcakes, rather than just baking a great tasting cupcake. There is nothing wrong with this, of course, and it does help to set those cookbooks apart from being “just another cupcake book.” Sometimes, however, you just want to bake some great cupcakes without making elaborate fondant decorations for them, too. Martha Stewart’s Cupcakes is a great place to start, with 175 recipes for delicious little cakes.

    The book is divided up into chapters by type of cupcake. There are simple cupcakes, swirled cupcakes, dipped, glazed, filled and layered cupcakes, as well as a number of cupcakes that are made and decorated for holidays, from Valentine’s Day to Christmas. With so many recipes, you will never get tired of all the options, whether you like chocolate chip cupcakes, coconut rum-raisin cupcakes or s’mores cupcakes. The recipes are well written and easy to follow, with great flavor in the finished product. Better still, all of the recipes have a photo alongside, so you know exactly what you have to look forward to.

    This is the kind of book that will become a nice reference in your collection of cookbooks, a place where you can always find a reliable cupcake recipe for just about any occasion. There are actually so many ideas in here that you don’t need to experiment much to find new flavor combinations (all you need to do is turn a page), but if you’re like me and enjoy finding new flavors on your own, you’ll definitely find that the techniques and components used in the recipes are things that you will turn to when you’re coming up with your own ideas.

  • Chocolate Coconut Easter Cupcakes

    Chocolate Coconut Easter Cupcakes

    While there is something to be said for light, citrusy spring-like desserts at Easter, it’s hard to deny that chocolate is a pretty good fit for the holiday. Maybe you can blame all that Easter candy in stores, from chocolate bunnies to peanut butter-filled eggs, but I don’t have any problem with another excuse to eat some chocolate. So, in my book, these Chocolate Coconut Cupcakes are a pretty good springtime option – and the chocolate bunny decorations I topped them with don’t hurt either.

    These cupcakes are moist and chocolaty, with a great cocoa flavor to them. The recipe makes a big batch of two dozen cupcakes, so it is perfect for a party, although you can cut the recipe in half for a smaller batch. I stirred some shredded coconut into the batter to give these a subtle coconut flavor, without competing with the chocolate. If you want to boost the coconut flavor further, I would recommended adding about a 1/2 tsp of coconut extract. I would also recommend chopping the shredded coconut before you stir it into the cupcakes. It has no effect on the baking time or on the finished result, but it does look a little better when you bite into the cupcake and see only small bits of coconut blended it.

    Most of the coconut flavor in these comes from the layer of shredded coconut on top of the cupcakes. For any occasion, you can leave the coconut white. If you are going to make these especially for Easter or another spring holiday, you may want to create coconut grass by dying the coconut green (as I did with some of these cupcakes). The coconut is held on by a thin layer of sour cream glaze, which is a great contrast to the richness of the chocolate. It’s not a very thick glaze (somewhere between a glaze and a frosting, really), but it sets up firmly enough to hold the coconut in place.

    Top them off with little chocolate bunnies, chocolate candies that look like speckled eggs, or even some Peeps before serving.

    Chocolate Coconut Easter Cupcake

    (more…)

  • Tropical Pineapple Coconut Banana Smoothie

    Tropical Pineapple Coconut Banana Smoothie

    It doesn’t take much to put me in the mood to make some smoothies. A warm day and the motivation to pull out the blender are all I really need – and the warmer the day, the more likely I am to want to pull out that blender! Once it’s out, of course, you still need to figure out what to throw in there. Fortunately, almost any fruit will do.I gave this smoothie a tropical twist. I started with ripe bananas, fresh pineapple and shredded coconut. I added some plain yogurt and coconut milk to give it a creamy texture, and the coconut milk enhanced the flavor of the shredded coconut. I ended up blending in a little bit of sugar, as well, but the smoothie has a nice natural sweetness on its own.

    It’s light and refreshing, and definitely a tropical start to the day if you make one of these with breakfast. You just need a little umbrella (and maybe a plane ticket!) and you’re ready for a little escape – at least, I know I was!
    (more…)

  • How to make Coconut Grass

    Coconut Grass

    Coconut grass seems to be a key decorating element of Easter desserts, or desserts for any spring holiday. It’s easy to see why, since its color can really add a splash of brightness to a display, and it is a lot more appropriate (and versatile) for accenting food than the plastic Easter grass you can buy for filling up Easter baskets. Coconut grass is nothing more than shredded coconut than has been dyed green. Shredded coconut, especially after it has been colored, really does have the look of blades of grass!

    To make coconut grass, add some shredded coconut to a large bowl and add in a few drops of green food coloring. Us a spatula or a spoon to mix the coconut and dye together; it may not seem like there is a lot of food coloring to go around, but the color will transfer quickly to the coconut as you stir. Add more coloring for a darker green.

    Once your “grass” is ready, you can use it to top off Easter cupcakes, decorate a cake plate for displaying an Easter Bunny Cake or simply use it to fill up a basket to make a nice (edible) display for some Easter eggs and chocolates.

  • How to make Wilton’s 3D Bunny Cake

    Cute Easter Bunny Cake

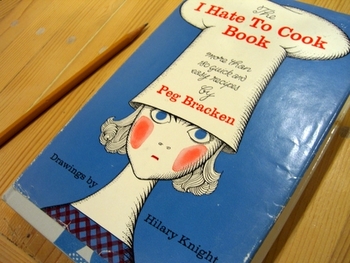
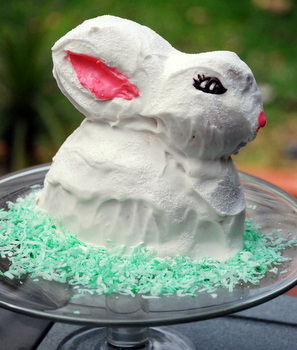
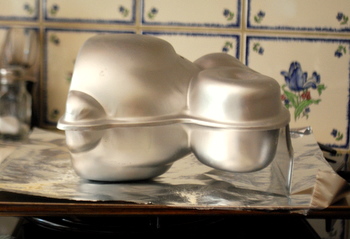
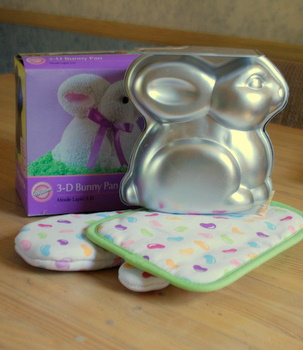
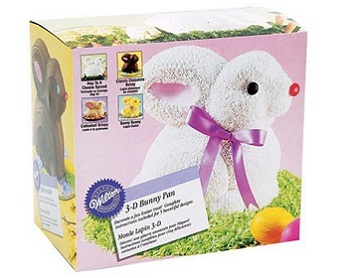
    I really like the look of Wilton’s 3D Bunny Cake Pan, so I was excited to try out my first bunny-shaped cake when I discovered one small problem with the pan: it doesn’t come with a recipe. Instead, it comes with decorating suggestions and simply states that you’ll need 4 1/2 cups of pound cake batter to make the cake. This was a bit of a problem for me because, let’s face it, it is much easier to bake a cake that is the right size for a given pan. I didn’t want to take the risk of starting off with a too-small recipe that couldn’t be sure would rise up enough to fill up the pan. So, I picked a high-rising variation on a pound cake recipe I like and scaled it down to fit the pan.

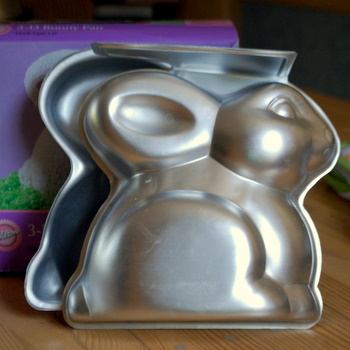
    This pan is very easy to use. You simply grease and flour it, then fill it with batter (once you’ve got the amount nailed down) and you’re ready to go. I was concerned that I wouldn’t be able to check the cake for doneness, since you can’t see the cake as it bakes, but fortunately there is a small hole in the top of the pan to fit a toothpick or cake tester into and it works well. The cake bakes on its side, and it is easiest to handle if you set it on a baking sheet.

    Bunny Cake Pan, side view

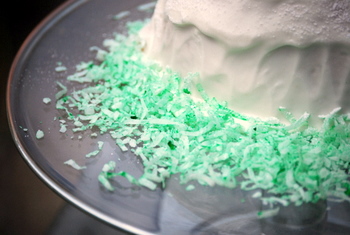
    This cake recipe is tender, with a good vanilla flavor to it. It is a bit lighter than some pound cakes, more like a cross between a yellow cake and a pound cake. It’s still easy to handle as you’re decorating and quite sturdy. Use a wooden skewer or an extra long toothpick to test this cake for doneness, since a short toothpick will not get all the way to the center of the pan to see if it is cooked through.

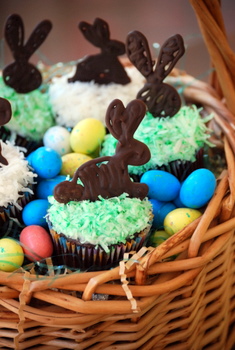
    Now, you can try other recipes in this pan, too. If you use a recipe that makes a big batch (say, a recipe that would ordinarily bake 2 dozen cupcakes), you can measure out the appropriate amount of batter for the bunny and bake the rest off as cupcakes. Choose a high-rising cake if at all possible to ensure that it will fill up the bunny. If you’re not sure, you’ll know you have enough batter when the bottom part of the bunny is almost completely filled up; this amount of batter will give you the best chance of having a complete bunny. And if you’re missing a tiny bit after baking – well, that is what frosting is for!

    (more…)

  • Baking Bites Easter Giveaway!

    Baking Bites Easter Giveaway

    Easter is right around the corner, and holidays are such a great time for giveaways that I can’t resist doing one with an Easter theme to it. I’m giving away Wilton’s 3D Bunny Cake Pan and a set of oh-so-cute jellybean potholders. To win, simply leave a comment that mentions your favorite Easter dish (or other spring holiday dish if you don’t celebrate Easter) below! A winner will be selected randomly from the comments below and entries will close at 12 noon (PST) on Friday, March 26th. This leaves plenty of time for the pan to arrive before Easter so you can use it next weekend! Be sure to leave your e-mail address in the comment form (not in your comment) so that I can contact the winner for a mailing address.

    There is a little bit of small print with this prize and that is the fact that this pan is not brand new and has been used by me a few times to test it out and bake up an Easter bunny cake. A post about the bunny cake will be coming up in the next day or two and you can double your chances of winning by looking out for that post and commenting on it, too. The cake pan will be all cleaned up and back in it’s box for mailing, ready to use when it arrives at your door.

    And as for my favorite Easter dish? It’s hard to choose just one thing, but if pressed I’d have to say that deviled eggs are near the top of the list, followed by Peeps Cupcakes, which are a current favorite. Peep S’mores are very tasty, too, but I’d be hard pressed to call them an actual dish!

  • Wilton 3D Bunny Pan

    Wilton 3D Bunny Pan

    Easter eggs are usually the centerpiece of an Easter celebration, as they are bright, colorful and fun to make. The same can be said about a cake made with the Wilton 3D Bunny Pan. This pan bakes a three dimensional bunny-shaped cake that sits upright on a cake stand. It is a great centerpiece for an Easter meal because, unlike the eggs, it really stands out (and up!). You can also eat the cake after it has been on display for a bit – something that I wouldn’t necessarily recommend you do with Easter eggs that have been sitting out for a while!

    This cake pan is made of aluminum and comes with two halves. Batter is poured into the lower half of the pan, then the top piece is locked into place on top. While in the oven, the cake will rise up and fill out both sides of the bunny, so there is no need to try to glue bunny halves together with frosting to make this cake stand up (although you can use the pans separately and try this method if you prefer. The pan is not nonstick, but the design is smooth with no narrow cracks for batter to stick in, so you can grease and flour the pan and expect your bunny to pop out easily. Once it’s done, you can decorate your bunny as you wish with frosting and brightly colored candies.

    Update: For a recipe a results, check out How to Make an Easter Bunny Cake!

    Wilton 3D Bunny Pan

  • Triple Threat Dark Chocolate Cookies

    Triple Threat Chocolate Cookies

    These cookies have a great name that promises to deliver a lot of chocolate – and there is no disappointment when you take a big bite, because these definitely pack a chocolate punch. The inspiration for this recipe came from a Sunset magazine article that featured a Portland, Oregon bakery – The Sugar Cube – recipe for Triple Threat Dark Chocolate Cookies. I made the recipe from the magazine, and made a few small tweaks to make it easier and perhaps even more chocolaty. The original recipe made very thin cookies that were good for sandwiching, while this variation makes nice and thick cookies that bake up be very chocolaty and rich inside, and a little more decadent seeming than a thin cookie.

    There are three kinds of chocolate in these. The dough starts out with a lot of dark chocolate melted into the batter and held together with not very much flour. I mixed in milk chocolate chunks, to add some sweetness to the dark background, and some dark chocolate chunks to make sure that the cookies kept their richness. Since walnuts are a frequent addition to brownies, they go very well with the dark chocolate flavors of these cookies. They’re not fudgy, like brownies are, but if you want to experiment with underbaking a batch I’m sure you could sneak some in there. Either way, you’ll have a great batch of these intense, rich, tender cookies to enjoy.

    The dark chocolate I used had a high cocoa percentage of about 76% (I actually used a mixture of dark and bittersweet Guittard chocolate). I mention this because the amount of cocoa in your chocolate will have a slight impact on how thick your batter is. A higher percentage will yield a slightly drier batter. The mixture will still come together, but you may have to rely on a mixer or give your arm a good workout to blend all those chocolate chips and nuts into the cookie dough.
    (more…)

  • Kitchen for Kids: 100 Amazing Recipes Your Children Can Really Make

    Kitchen for Kids: 100 Amazing Recipes Your Children Can Really Make
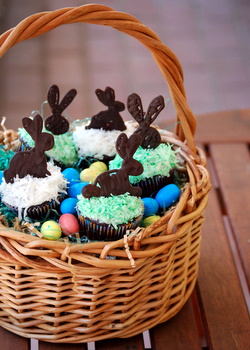
There are plenty of kids cookbooks out there, and the ones I tend to like best are the books that have recipes that I am tempted to try myself. This means that the books usually contain “real” recipes and lots of photos, not just variations on peanut butter sandwiches and simple snacks (both of which are good, especially in a kids book, but are not really what I’m looking for in a cooking book in general). Kitchen for Kids: 100 Amazing Recipes Your Children Can Really Make definitely has real recipes. This cookbook focuses on baking, and after a first chapter that covers breakfast, lunch and dinner items, it dives into chapters devoted to breads and crackers, cookies, cakes, pies and pastries, and candies and cool treats.

    The recipes in this book are well written and easy to follow. Their instructions are broken down into simple steps that make the recipes easy to complete, and young cooks should have no problems following along. There are even suggestions throughout the book that will make cooking a little easier, like reminders not to touch things when they come out of the oven and are hot. I actually also like the fact that the recipes include optional ingredients for different variations, so kids can start out customizing the recipes as they like right away. And of course, there are lots of great pictures.

    The introduction to this book is written for parents, or for anyone else lending a hand to supervise in the kitchen. It tells you how to set up your workspace to make it kid-friendly, and offers helpful suggestions (such as laying all the required ingredients out in advance or pregreasing the pans so they’re ready to use) so that kids can make these recipes on their own. There are some notes that will help out would-be bakers, such as the bits that cover how to measure ingredients and those that describe the most commonly used kitchen tools and their functions. This book is going to be most appropriate for kids who are a little bit older or are a little experienced in the kitchen, simply because some of the reipes (like the yeast breads) might be too complex for younger kids to do on their own. Still, the recipes are very appealing and as long as you don’t mind lending a hand, you should be able to make these with young chefs and bakers of any age.

  • Layer Cake Shiraz 2008, reviewed

    Layer Cake Shiraz 2008


    “My old grandfather made and enjoyed wine for 80 years. He told me the soils in which the vines lived were a layer cake. He told me the soil in which the vines lived were a layer cake. He said, the wine, if properly made,was like a great layer cake, fruit, mocha, chocolate, and hints of spice — and rich, always rich.
    ‘Never pass up a good Layer Cake,’ he would say.

    “I have always loved those words.”         (from the wine’s label)

    I tried to resist trying this wine when I first saw it in stores a couple of months ago, but it was simply too difficult to resist the tempting illustration on the front of the bottle and the equally tempting description of what a wine should be in the quote above, which is featured on the front of the bottle. Plus, I also like shirazes. So I bought a bottle to give it a try.

    Layer Cake Shiraz is made by Layer Cake Wine, and is produced in McLaren Vale in South Australia. It’s a nice, well-balanced shiraz that has a lot of fruity, berry flavor to it. And it tastes very clean, not overly sweet or jammy; it tastes more like fresh berries. I can detect blueberries, blackberries and cherries in there. Keep in mind that I am not an expert wine taster, so I can’t accurately describe all of the other flavors mentioned in the wine’s tasting notes. Still, as a more experienced layer cake taster, I can tell you that this is a lovely and complex wine that would go very well with a chocolate or spice cake for dessert, as well as with a burger or steak at dinner.

  • Browned Butter Dutch Baby Pancake

    Browned Butter Dutch Baby

    A Dutch baby pancake is a big, puffy, custardy pancake that is baked in a skillet in the oven. If it came down to it, I would say that it’s a little bit like a cross between a pancake and a popover, only better. The babies are easy to make, but take a little longer than regular pancakes to cook, so I tend to save them for lazy mornings when I am planning to sit around and enjoy a leisurely breakfast. I like a basic Dutch baby with lots of maple syrup, but I gave this one a little more depth of flavor by adding browned butter to the recipe. It only took a couple of minutes to brown the butter and add it to the batter, so not much extra cooking time was added for a lot of extra flavor.

    Since you need to brown the butter for this recipe, it doesn’t really make sense to brown the butter in one pan and preheat another skillet up in the oven, a step which is typically part of the technique used to get a high rise on these pancakes. Instead, just prepare the pancake batter and preheat the oven, then the brown the butter in the pan you intend to use to bake the Dutch baby. Whisk the browned butter quickly into the rest of the already made batter, then transfer everything back into the hot and greased pan (with all of that nice browned butter flavor there, too) and slide it back into the oven to finish cooking.

    The dutch baby will sink a bit as it cools, so don’t worry if it deflates a little before you serve it (although like a souffle, you basically want to serve it as soon as it comes out of the oven). The pancake will still have nice crisp edges and a firm, yet slightly custardy, center to it.

    (more…)

  • Stamp & Style Easter Cookie Cutters

    Stamp & Style Easter Cookie Cutters

    When I decorate cookies for Easter, I typically use some sort of colored frosting to create the designs, or simply rely on brightly colored sprinkles and candies to give the cookies a holiday look. Like decorating Easter eggs, however, using just two techniques can get a bit boring after a while. It’s nice when Easter eggs look unique, as well, as festive, and the same is true of Easter cookies. This Stamp & Style Easter Cookie Cutters set from Williams-Sonoma provides you with everything you need to spruce up those Easter cookies and make them a little fresher. The festive stamps and easy-to-use rollers allow you to create everything from borders of bunnies to wavy lines and zigzags all over your eggs. They’ll really allow kids to get creative when they decorate the cookies, too.I have to admit that part of the appeal here is that Easter egg cookies made with this set will be less messy (no dye on fingertips) and much tastier than real Easter eggs, and while you can’t hunt for them in the garden, nothing will be wasted because you can eat them all up when the holiday is over.

  • Ban on Bake Sales at NYC Schools?

    In the name of the greater campaign to fight childhood obesity, the New York City City Council is heavily restricting the number of bake sales that can take place at New York City Schools. Their stance is that homemade rice krispy treats, pumpkin bread and cupcakes aren’t a part of “the wellness puzzle” as they see it. Instead, the products that will be permitted to be sold at schools must come from a list of 27 packaged foods that meet city health department guidelines.

    PTA members are strongly against this idea, which will restrict sales to once a month or in the late evenings (when parents are probably coming to schools for meetings and very few children are present), because the money that these frequently held sales pay for lots of extracurricular programs that there is no money in the school budget for. Baking is also a great family activity, getting parents and kids together at home, working together, to support their community and their schools.

    I’m all for home baking, of course, and the thing that strikes me the most about this issue is also something that struck Laura Shapiro, a food historian and author, in the article: “[W]e’re supposed to believe that a packaged chocolate-chip cookie is preferable to a homemade one, not on the basis of taste, texture or the quality of the ingredients, but because it came from a factory and has a nutrition label.”

    (more…)

  • What is the best sugar for creme brulee?

    What is the best sugar for creme brulee?

    Creme brulee’s signature is that crisp, caramelized crust that sits atop the delicate custard. You make it by sprinkling on a layer of sugar, then caramelizing it with the flame of a kitchen torch. If you’ve made creme brulee, before you may have run into a common problem with this straightforward-sounding step. Sugar that is in too thin of a layer won’t caramelize into a crisp crust. Sugar that is too coarse will not caramelize easily, leaving you with uncooked sugar at the top of your brulee or with a slightly melting custard beneath a topping that needed too long under the torch.

    The best sugar for topping off a creme brulee is superfine sugar. Its tiny crystals caramelize quickly and easily. You can find it at most grocery stores, but if you can’t, regular sugar is your next best bet because it is also relatively fine in texture. Brown sugar is too moist and clumpy and raw sugars tend to be far too coarse. If you have a large-grained sugar that you would like to use, give it a whizz in the food processor to break down some of those crystals and make it more like regular or superfine sugar, then use it to top off your brulee.

  • Blackberry Clafoutis

    Blackberry Clafoutis

    When you have fresh berries around, a clafoutis is a great way to showcase them. A clafoutis is a French dessert that is somewhere between a cake and a custard. It is just firm enough to slice easily, as cakes are, but it is based heavily in milk and egg, and has a lovely custard flavor and texture to it. The vanilla-scented batter is a great backdrop to all kinds of fruit. Pear Clafoutis is one of my favorite variations, but I’ve used blackberries for this batch.

    Fresh blackberries go very well with the vanilla custard flavor of this dish. They’re bright and have a nice sweetness to them – and I have to admit that their beautiful purple color is offset very well by the pale clafoutis. You can use frozen berries, but your clafoutis will take a few minutes longer to bake and the berries might loose a little bit of their texture as the dish bakes. I think that fresh berries are your best bet, and you can easily mix in some blueberries or raspberries in this, too.

    This clafoutis batter mixes up very easily in just one bowl (or in the food processor) in about 2 minutes. It has very simple ingredients, so as long as you have berries on hand, you can quite literally start putting this together on a moment’s notice. When you pull it out of the oven, you’ll notice that it rises like a souffle, thanks to the number of eggs in the batter. It will fall slightly as it cools, so don’t worry if yours doesn’t remain puffed up after it finishes cooking.

    You can serve this dish warm or chilled, it is very tasty both ways. It can be made a day in advance, but it really looks and tastes its best within a day of making it, so I would try to make it the day you will be serving it if possible.

    (more…)

  • Baked Treats for St Patrick’s Day

    Recipes for St Patrick’s Day

    Two of the most observed traditions of St Patrick’s day are probably pinching someone who isn’t wearing a bit of green and knocking back a couple of green beers. Ok – those probably aren’t the most popular St Paddy’s Day traditions, but they certainly seem to be ones that people enjoy! I personally like to celebrate with a little bit of Irish Food, like corned beef, braised cabbage and some homemade baked goods.

    I’ll always do an Irish Soda Bread. These loaves are easy to make, since they’re leavened with baking soda and not with yeast. there are many variations on the traditional loaf, and I like mine slathered with Irish Butter. Soda Bread Farls are another great variation on this type of bread, baked directly in a skillet instead of in an oven.

    Irish cream makes an appearance in many of my desserts for St Patrick’s Day. Irish Cream Brownies and Bailey’s Cheesecake Bars aren’t exactly traditional desserts, but they’re delicious none the less. Irish Coffee is a good pairing with an dessert.

    I would do more green desserts, but green is one of those colors that doesn’t always flatter foods that aren’t naturally green. That said, there are some green dessert ideas out there. Homemade by Holman made some absolutely amazing Shamrock Sandwich Cookies. These dark green cookies are soft and cake-like, so these sandwiches are really a variation on whoopie pies. The secret to making them is piping out the cake batter into clean shamrock shapes before baking them. Nutmeg Nanny whipped up some Green Velvet Cupcakes for the holiday, too. Like the whoopie pies, these also use green food coloring with great effect. Keep in mind that it is a good idea to go with a lot of food coloring; the brighter the color the better your green sweets will look.

  • Odd Size Measuring Spoons

    Odd Size Measuring Spoons

    Most measuring spoon sets have just four spoons: 1/4 tsp, 1/2 tsp, 1 tsp and 1 tbsp. With these four spoons, you can get done all the measuring you need to do for most recipes. That said, there are plenty of times when you might end up with a measurement that doesn’t fit neatly into one of these sizes. For instance, an old recipe might call for “a pinch” of something, while a big recipe that you’ve cut down for a smaller batch might end up needing 2/3 of a teaspoon. I will divide or estimate as needed to make these sizes work with my existing spoons, but it is much more convenient to have measuring spoons that encompass these unusual sizes. This set of Odd Size Measuring Spoons covers just about all the measuring spoon bases you might need. The set includes a “pinch”, 1/8 tsp, 1/4 tsp, 1/2 tsp, 2/3 tsp, 1 tsp, 1 1/2 tsp, 2 tsp and 1 tbsp measures, all clipped together for easy storage. I’ve seen several other off-size spoon sets that don’t include the standard measures along with the unusual ones, so it’s nice that this set will do it all. Each spoon is also marked with milliliter equivalents, which is handy if you use European/international recipes that don’t rely on teaspoons for measurements.

  • Chocolate Pomegranate Bundt Cake

    Chocolate Pomegranate Bundt Cake

    Pomegranates are packed with antioxidants, which means that there are a lot of potential health benefits packed into each fruit. Pomegranates are a bit difficult to eat, since each little seed – although tasty – doesn’t have a lot of juice or flesh surrounding it, so it takes quite a while to consume one. This is where pomegranate juice comes in, making it easy to enjoy the flavor of pomegranate without the work involved in eating a whole fruit. The juice can be used in many different types of dishes, and while I often see it reduced in a sauce, I used some to sweeten up a chocolate bundt cake.

    This cake is moist, chocolaty and has a tender, but slightly dense, texture. It’s a great bundt cake because it’s easy to make and each slice is satisfying to eat. I used pomegranate juice as the primary liquid in this cake, where I might use milk, buttermilk or coffee in another chocolate cake. There is a lot of cocoa powder in here, so you can’t directly taste the pomegranate flavor in the cake. You can definitely tell the juice is there, however, because there is a lovely fruity sweetness to the cake that adds some complexity to the flavor. Not wanting to skimp on the chocolate, I incorporated some chocolate chips into this cake, too.

    I used POM Wonderful pomegranate juice in this cake, because it is pure pomegranate juice and not simply flavored white grape juice. Definitely take the time to look for pure juice when you make this cake, both for that fruity flavor and for the antioxidants (don’t forget that there are also plenty in the cocoa powder in this cake!). It’s pretty easy to justify having a second piece when you can say you’re doing it for health reasons!
    (more…)

  • The I Hate To Cook Book

    I Hate to Cook Book


    Some women, it is said, like to cook.
    This book is not for them.

    This is how The I Hate To Cook Book starts out. The cookbook, first published in 1960 (a 50th anniversary edition of the cookbook is being released in just a few months), has been a hit with home cooks ever since. The cookbook does contain more than 180 recipes, but its biggest selling point is that it is witty and fun to read, with a fantastic tone that will make you want to read every recipe just to hear what author Peg Bracken has to say. It reminds you that it is ok to have realistic goals in the kitchen – such as getting through dinner with a minimum amount of work, or finding to easiest possible dish to bring to a potluck – rather than needing to aspire to be the next Martha Stewart with every dish that you make.

    The book has 13 chapters, with the last two covering household and kitchen tips rather than adding too many more recipes. The chapters have titles like “Company’s Coming, or Your Back’s to the Wall” and “Desserts, or People Are Too Fat Anyway.” The recipes are very detailed with the sort of instructions that will make sense to even a non cook, such as “cook until it’s the color of a nice camel’s hair coat” can easily follow. Don’t be fooled by all the joking in the book, however: Peg Bracken was a good cook (whether she wanted to be or not!) and these are good recipes.

    Since this is an older cookbook, some of the recipes are a bit outdated, but most are just as current as those you’ll find in any other all purpose cookbook. There are no full-color pictures (at least not in my 1960 edition) to show you want the recipes should look like. It has plenty of lovely pen and ink illustrations by Hillary Knight that will make you smile as you go through the chapters.