Author: El Di Pablo

  • How To Setup A Free PGP Key Server in Ubuntu

    There are a number of public PGP key servers out there, but if we wanted to make sure we had some level of trust, we wanted to maintain and control our own key server. Well it turns out that in Ubuntu, setting up a PGP/GPG key server is just as easy as setting up PGP/GPG in general.Just do the following:

    1. Install the sks package>sudo apt-get install sks
    2. Build the key database>sudo sks build
    3. Set database permissions>sudo chown -Rc debian-sks:debian-sks /var/lib/sks/DB
    4. Set the server to start automatically at bootset initstart=yes in /etc/default/sks
    5. Start the service >sudo /etc/init.d/sks start

    That is it! Now your server is listening on port 11371 for key requests. You can now send and retrieve keys to and from the server using your favorite key manager!

    If that is not good enough for you, then you can also add a web interface to handle your key searches and requests. To do that you will need to install Apache:

    >sudo apt-get install apache2

    Once installed create a directory called www in /var/lib/sks/. Download the index.html and keys.jpg file you will need here: (OpenSKS Web Interface)

    Extract the contents to /var/lib/sks/www/. Edit index.html and change the three references to your.site.name (currently at lines 20, 36 & 62) to the url of your keyserver, for example keys.bauer-power.net. Now set the correct permissions on that directory: >sudo chown -R debian-sks:debian-sks /var/lib/sks/www

    Now if you browse to http://your.server.name:11371 you will see a nice, user-friendly web interface for doing public key exchanges!

  • How To Hack Your MagicJack To Make Calls From Any SIP Enabled Softphone in Windows and Linux Part 3 – Using Your MagicJack info in Linux

    Okay, if you have been following along all week I have showed you how to obtain your Magicjack username and password by doing a memory dump, and I showed you how to use that information to connect a softphone in Windows. What about you Linux users? Well, I am a Linux user myself, so I will show you guys how to do it too.

    Like I said before, using other methods to connect to you Magicjack service other than the way magicjack wants you to (USB dongle in Windows) violates their TOS. I accept no responsibility if you lose your account because you want to hack your Magicjack. The following is for educational purposes only, and if you do this, you do so at your own risk.

    Ok, lets get what we need:

    As I mentioned in yesterday’s post, the way I believe Magicjack authenticates with their proxies is they combine your password with their proxy info to create an MD5 hash. With that hash your can authenticate with their proxies to make and receive calls. Without it, you will not be able to connect. In Windows I mentioned a tool called MJMD5 that creates this hash authentication for you. In Linux, it is a little bit different. In Linux, you have to compile the tool yourself. I am using Ubuntu 10.04 for this.

    1. magicjack Install gcc so you can compile the source code

      >sudo apt-get install gcc

    2. Create a directory called mjproxy

      >mkdir mjproxy

    3. Change into the newly extracted directory

      >cd mjproxy/

    4. Download the mjproxy source

      >wget ftp://ftp.bauer-power.net/misc/magicjack/mjproxy.c.tgz

    5. Extract it

      >tar -xzvf mjproxy.c.tgz

    6. Compile the source code into a program

      >sudo gcc -o mjproxy md5.c mjproxy.c

    7. Give everyone full permissions

      >sudo chmod 777 mjproxy

    8. Make the program file executable

      >sudo chmod +x mjproxy

    9. Run the following to start the proxy authentication process and leave it running

      >./mjproxy 0.0.0.0 5070 proxy01.<yourcity>.talk4free.com 5070 <MagicjackPassword>

    mjproxy

    Now that we have our MD5 proxy running, we are ready to setup our SIP softphone! For this I used Twinkle which is available in the repositories. To get it working, do the following:

    1. Install Twinkle

      >sudo apt-get install twinkle

    2. After installation open Twinkle from Menu > Internet > Twinkle
    3. Setup your account information with the following:
      • Your name: Whatever you want
      • Username: Your Magicjack Username (E<YourPhoneNumber>01)
      • Domain: 127.0.0.1:5070
      • Realm: Blank
      • Authentication Name: Your Magicjack Username (E<YourPhoneNumber>01)
      • Password: Your Magicjack Password
      • AKA OP: Leave Deafault
      • AKA AMF: Leave Default
    4. Click OK and you are ready to go!

    twinkle1

    Now you can make Magicjack calls from your Linux machine! Make sure you have a good USB microphone headset though. When I tried it on my laptop with the internal mic there were a lot of echoes.

    The cool part of this setup is that you could configure mjproxy to run as a service by adding it to init.d… Hmmmm, with that you could configure say…. Asterisk or 3CX to authenticate with Magicjack, and share out that number with a bunch of users using extensions.

    << Part 2

    Part 1 >>

  • How To Hack Your MagicJack To Make Calls From Any SIP Enabled Softphone in Windows and Linux Part 2 – Using Your MagicJack info in Windows

    Yesterday I wrote about how to obtain your Magicjack password by doing a memory dump in Windows. Well what good is that information if you don’t know how to use it? I’ll tell you, it isn’t any good at all! So in the post, I will tell you how to setup a softphone in Windows so you can make inbound and outbound calls using your Magicjack number without having to use the USB dongle! Not to mention, you can set this up on multiple computers!

    Once again I want to re-iterate that this violates Magicjack’s TOS. This article is purely for informational purposes, and I accept no liability if you get your Magicjack account pulled because you want to screw the man!

    With that little bit of legal mumbo jumbo out of the way, lets get together the stuff you will need:

    No, I didn’t mention this in the last post, but you can’t simply use your Magicjack username and password by itself to make inbound and outbound calls. The reason being is the way Magicjack does authentication. Now correct me if I am wrong, but what I gather is Magicjack takes your password and combines it with the proxy for your city and creates an MD5 hash. It then uses that hash to authenticate with the proxy. If you don’t have that hash, you cannot authenticate, and thus cannot make calls. That is where MJMD5 comes in.

    1. Go ahead and download MJMD5 and run it.
    2. Enter 5070 for both the listening and the forwarding port.
    3. Enter your local proxy (proxy01.<yourcity>.talk4free.com)
    4. Enter your Majicjack password
    5. Save your settings
    6. Click Start

    MJMD5

    With that running, download and install Xlite’s free softphone on the same computer and enter the following:

    1. Display Name: Whatever you want
    2. Username: Magicjack Username (E<yourphonenumber>01)
    3. Password: Your Magicjack password
    4. Authorization user name: Magicjack Username (E<yourphonenumber>01)
    5. Domain: 127.0.0.1:5070
    6. Check Register with domain to receive incoming calls
    7. Select the domain radio button
    8. Click Apply then OK

    xlite

    That is it! Now you can make inbound and outbound calls without your Magicjack USB dongle in Windows. You can also set this up on as many computers as you want!

    Check back tomorrow where I show you how to do the same thing in Linux!

    << Part One

  • How To Hack Your MagicJack To Make Calls From Any SIP Enabled Softphone in Windows and Linux Part 1 – Getting Your Magicjack Password

    Over the last few days I decided I was going to figure out how to hack my Magicjack so I could make calls using the SIP information no matter where I was without having to carry around my Magicjack USB dongle. Also, I wanted to be able to make calls in Linux and Windows. Before I could do any of that though I needed the SIP information for my Magicjack!

    You see, Magicjack is really a simple device that uses the standard SIP protocol to make inbound and outbound calls. If you are not familiar with SIP, here is an explanation from Wikipedia:

    The Session Initiation Protocol (SIP) is an IETF-defined signaling protocol, widely used for controlling multimedia communication sessions such as voice and video calls over Internet Protocol (IP). The protocol can be used for creating, modifying and terminating two-party (unicast) or multiparty (multicast) sessions consisting of one or several media streams. The modification can involve changing addresses or ports, inviting more participants, adding or deleting media streams, etc… Other feasible application examples include video conferencing, streaming multimedia distribution, instant messaging, presence information, file transfer and online games.

    Since SIP is the standard, in theory you can take the SIP information from Magicjack and use it on any SIP enabled phone. All you need is the correct Proxy info, username and password! That is where things get tricky. Magicjack doesn’t want you having this information, and using it for any other way other than its intended use is a violation of TOS. I accept no liability if you get your account pulled for violating TOS. This post is purely for informational purposes only.

    In theory, one could pay $20 per year for their Magicjack service, then use the SIP information to share out their number using a SIP PBX like Asterisk to say… Oh… 30 users or so. Imagine a small business doing this? The savings could be huge! Once again though, it violates TOS so I wouldn’t recommend it.

    In order to get your username and password you will need the following:

    You will also have to disable autorun on your Windows workstation. I will let you Google that for yourself. The reason you have to do that is because when you plug in your Magicjack dongle, Windows maps it as a USB drive, launches Magicjack, and then unmounts the USB drive. We don’t want it to do that, as timing is everything. After you have autorun disabled do the following:

    1. Unplug your Magicjack
    2. Kill any Magicjack processes
    3. Unzip MagicJack_Utilitieswsip.zip
    4. Navigate to where you unzipped it, and run SIPDump.exe and enter 4 or 5
      sipdump
    5. Now plugin your Magicjack and manually run MagicJackLoader.exe
    6. When you see the below screen, press OK to start the memory dump process from SIPDump.exe (Note, you have to be fast!)
      sipdumppic3
    7. Let the dump run until you see the following screen:
      sipdumppic4
    8. Go ahead and close out of SIPDump, and you will have several text documents called SIPDump1, SIPDump2 etc. Open Each one that has a file size of 19,000KB or over and do a search for the string SIP.Connection.Refresh with the whole word only option selected.
    9. Hit the search button, and then once more. If there are two selections found, then your password should be within 5-10 lines up or down from the string. The password will be a 20 character password all uppercase usually beginning with the letter B. For example: B6QK1RE4HU7QK8P3ABZB (Made up one)

    sipdump7

    That is the tricky part. Once you have that, the rest is easy. For example, your username will be the Letter E<YourPhoneNumber>01. The proxy will be proxy01.<yourcity>.talk4free.com. For example:

      • E619123456701
      • proxy01.sandiego.talk4free.com

    Tomorrow I will show you how to use this information to use a SIP enabled softphone to make calls in windows without your Magicjack dongle. Then the next day after that, I will show you how to do it in Linux! Stay tuned!

    [Via MagicJackHacks]

    Technorati Tags: ,,,,,

  • Change The Login For Ubuntu Is Even Easier!

    Back in Ubuntu 9.10, the good ol’ folks over at Canonical decided to use a different style of login than in previous versions. Before karmic Koala, you could download really cool themes to skin out your GDM login page, and make it look really cool. You could find skins and themes that matched your personality, and make a custom look that was an expression of you! When 9.10 came out, things changed a bit.

    I wrote about one way to change the look of your login page back when 9.10 came out. It basically consisted of a command to run as root so you could change your wallpaper, icons, and theme. What was the big change? Well, they did away with the GDM login and went with a faster loading X11 login. Their goal was to decrease boot times at the expense of being pretty.

    The way I did it before was okay, but it is sometimes hard to remember funky terminal commands that you don’t use very often. I mean, I only used the command I mentioned when I first setup Bauer-Puntu, then after that I just used Bauer-Puntu for new installs. Well, now I don’t have to remember that command. I can simply install the new GDM2Setup tool! To install it, run the following commands:


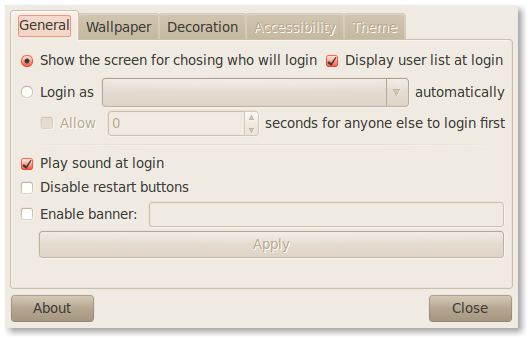
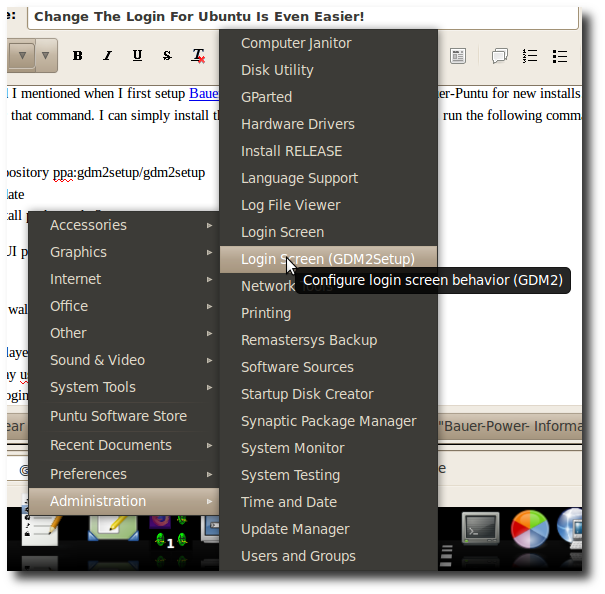
    1. sudo add-apt-repository ppa:gdm2setup/gdm2setup
    2. sudo apt-get update
    3. sudo apt-get install python-gdm2setup

    After installing the program, you will find it under the Administration menu. This will give you a GUI program that easily lets you:

    • Set login screen wallpaper, theme & icon set
    • Blur wallpaper
    • Set autologin/delayed login
    • Choose to display userlist
    • Enable/disable login sounds
    • Set login banner message

    Here is a screen shot of what the program looks like after it is installed:

    Pretty cool right? The best part about this program for me was it lets me get rid of the Ubuntu logo from the login screen. I suppose I could have done that before using the old terminal command, but I didn’t realize it until this program. To do that you just have to change the icon theme from the decoration tab:

    Pretty cool right? I think I will be using this tool when Bauer-Puntu 10.10 comes out! What tools do you use to customize your Ubuntu experience? Let us know in the comments!

  • Goodbye Google Apps Start Page! You Will Be Missed!

    I have been an avid Google Apps user for a while now, and have even blogged about it in the past. I use Google Apps for hosting my personal Bauer-Power email even. Though they have made it harder to find on their page, Google is still making a free version of Google Apps called Google Apps Standard Edition so you can take advantage of that too. Overall, I have been very happy with the service… Until now!

    You see, on May 13th I received an email stating that they are doing away with the Google Start page service do to requests to make it more like iGoogle. Their response? Do away with it altogether, and replace it with iGoogle. What does that mean for people like me who use it? All my customizations go away! Nice! For you Bauer-Puntu users you will notice that the default home page in Firefox was my Google Apps Start page, not anymore. My custom start page is now history!

    Here is the email from the Google Apps team:

    evil google logo Dear Google Apps admin,

    We’re sharing some news about changes coming in response to many customers who would like the Start Page to work more like the full iGoogle.com experience.

    On July 1, 2010, the Start Page will automatically be converted to iGoogle.  The Start Page gadgets your users have configured will be migrated to iGoogle pages, after which users can modify their iGoogle gadgets, tabs and themes.  Your Start Page web address will automatically redirect your users to iGoogle.

    No further action is required on your part, but you can convert your Google Apps Start Page to the full iGoogle experience before the automatic migration takes place by opting in from the control panel.  Alternatively, if you would like to retain more control over the user experience, you can consider creating a new User Start Page in Google Sites (http://goo.gl/R4uH), which allows for locked content and control over available gadgets.

    We hope this upgrade to iGoogle will give your users a better way to personalize, customize and centralize the information that’s most important to them.  If you think they would benefit from advance notice about this change, please communicate to them as desired.

    Thanks,
    The Google Apps Team

    As the email above states, the change will go into effect on July 1st, however you can make the change right away if you wish. I decided not to prolong the inevitable, so I made the change, then also changed DNS for start.bauer-power.net to point to my FTP server where I configured a new Apache site for it. It is a lot simpler than the old Bauer-Power Start page, but it’s better than a non-custom iGoogle page!

    What ticks me off the most is that their reasoning is utter bull crap. Google Apps Start was exactly like iGoogle already, and all the iGoogle widgets worked on it. The only thing was you could customize it. No, this is a marketing/branding move on Google’s part. Plain and simple! Well I say, damn the man!

    What is your take on it? Are you happy about the move? Let me know in the comments.

    Technorati Tags: ,,

  • How To Sync Exchange Calendar With Thunderbird and Lightning

    Yesterday I posted about setting up a PGP key server in Ubuntu for use at work. That is one piece of the puzzle. The second piece of the PGP puzzle is integrating PGP with your email client so that you can easily send and receive encrypted messages.

    I always recommend gpg4win for Windows users looking for a free OpenPGP solution in Windows. In Linux, GPG is built in, but in Windows you have to find 3rd party software to get the job done. In Microsoft Outlook 2003 and 2007, the Outlook plug-in that comes with gpg4win works great. The problem? We are now using Outlook 2010 in the office. Sometimes it sucks to be bleeding edge because old software isn’t always compatible.

    You know what works well for PGP/GPG though? Mozilla Thunderbird with the Enigmail extension. The problem with Thunderbird is that it doesn’t natively support Microsoft Exchange. Sure there are tricks to get it to work, but in reality the best way is to enable secure IMAP and SMTP to your Exchange server. You can easily do that on ports 993 and 587 the way Google does with Gmail. If you don’t know how to do that, look it up because it is beyond the scope of this post!

    lightning Anyhoo, back on track. So I configured Secure IMAP/SMTP on my Exchange server, and got Thunderbird working fine… Well, except Calendar and Contacts. The contact issue wasn’t a big deal because I just imported them in from Outlook. My Calendar however is dynamic, and I like it to have a two-way sync with Exchange. Also, there isn’t a built-in calendar for Thunderbird. That is where Lightning comes in. Lightning is a calendar extension for Thunderbird and Seamonkey.

    Okay, so I installed Lightning, but it doesn’t automagically start working with Exchange. For that I needed yet one more extension. It comes as a private 3rd party extension called The Microsoft Data Provider for Thunderbird Lightning. Here are some of the features it provides:

    • Creating, modifying, deleting calendar items.
    • Inviting attendees to meetings and sending meeting requests.
    • Free/Busy information when inviting other Exchange users to meetings.
    • Notifications for meeting requests
    • Configuration autodiscovery

    Now, with the exception of accepting/declining inbound meeting requests (Still have to use OWA for that) I can fully manage my calendar through Thunderbird and have it sync with Exchange!

    Are you using Thunderbird  with Exchange? Know of any other cool plug-ins and extensions to make it work better? Do you use PGP with Outlook 2010? What plug-in do you use for that? Let me know in the comments!

  • How To Force SSL Using PHP

    I mentioned a few days ago using osTicket, we have been using it for a while. We also have to make it public facing so our customers can use it, and so we can use it from outside of the office. The problem is that since we are using our AD credentials to login there is a major security concern since by default, osTicket is not encrypted. We opted to use SSL encryption on our ticket system.

    No big deal right? Well, we also want to make it so users don’t have to remember to type in the httpS part in the address. We want them to be able to type support.companydomain.com and have it automagically go to our ticket system. Likewise, on the admin page we want to make it so that when you go to support.companydomain.com/admin it automagically gets SSL encryption too. One way to do it is to drop an index.html file in with a redirect, that works ok too, but what if you want to ensure that if the S in httpS is removed, users still get forced to use SSL without any errors? Well in this case I used a little PHP magic.

    I created a file called encrypt.php with the following code:

    <?
    function secure_page()
    {
    if ( !isset($_SERVER[‘HTTPS’]) || strtolower($_SERVER[‘HTTPS’]) !== ‘on’ )
    {
    header (‘Location:
    https://’.$_SERVER[‘HTTP_HOST’].$_SERVER[‘REQUEST_URI’]);
    exit();
    }
    }
    secure_page();
    ?>

    php On any pages where I wanted to ensure SSL, I added the following line:

    require(‘encrypt.php’);

    Similarly, in our old ticket system (Which we are upgrading today now that Ubuntu 10.04 is out!) we added a custom reCaptcha on the ticket request page. Since we weren’t hosting the reCaptcha ourselves we couldn’t encrypt it with our SSL cert, and users would get prompted if they wanted to display the unsecure items. That confused people, so we wanted to make sure that page was not encrypted with SSL.

    To do that, we did the same as above except this time we created a file called decrypt.php with the following code:

    <?
    function unsecure_page()
    {
    if ( isset($_SERVER[‘HTTPS’]) || strtolower($_SERVER[‘HTTPS’]) == ‘on’ )
    {
    header (‘Location:
    http://’.$_SERVER[‘HTTP_HOST’].$_SERVER[‘REQUEST_URI’]);
    exit();
    }
    }
    unsecure_page();
    ?>

    And once again on that page we added the following line:

    require(‘decrypt.php’);

    Done, now on all the pages we want to be encrypted, it is encrypted, and on the pages we don’t want to encrypt it isn’t. Luckily in the new version of osTicket captcha is built in, so I can encrypt all pages without issue.

    In both cases, since we wrote those files we can include them on any page we want, including on our phpMyAdmin page! Boom!

    Do you use this method to force SSL on your LAMP servers? If not, what do you do? Let us know in the comments.

    Technorati Tags: ,,,,,

  • Put ASCII Art in Your MOTD

    I once wrote about this for AskTheAdmin, and thought that perhaps I should write a little something about it here too. Mainly because I recently did this at work when I setup a new osTicket system running on Ubuntu 10.04 server.

    You see, when you have to do work on Linux servers all day, after a while the geekiness of the terminal can get to you, so you have to do something to liven things up a bit. What do I do? I add a little ASCII art to my MOTD. For those that don’t speak geek, MOTD stands for “Message of The Day” and it is the first thing you see when you log into a Linux/Unix server. Admins can put important messages like maintenance windows, downtime, etc. I like to put silly pictures.

    Here is an example of my work:

    ASCIINice right? You can get plenty of ASCII images just by doing a quick Google search. I got the one above from Ascii-Art.de. To add the art to your server all you have to do is edit the /etc/motd.tail file with your favorite text editor.

    >sudo nano /etc/motd.tail

    Just copy and paste your art in and save it. On your next reboot your ASCII awesomeness will be there to greet you when you login!

    What do you like to do to make your Linux systems unique? Let us know in the comments!

  • How To Make osTicket 1.6.0 Authenticate with Active Directory

    Back in September of last year I wrote up an article on how to get osTicket to authenticate with Active Directory. That article was based on version 1.6 RC5. It actually worked very well for my company. Users could simply login to the staff panel with their domain\username credentials.

    Well, we started getting weird database errors recently, so I thought it might be good to move away from the RC5 version, and move to the final release. Well, if you read the comments at the bottom of my previous article you will know that my customizations didn’t carry over to the final release. That is ok though, because I found an even better and easier way to get osTicket to authenticate with AD. I got it working in about 2 minutes in Ubuntu Server 10.04.

    First you will need one little perquisite package, php5-ldap. Just run the following:

    >sudo apt-get install php5-ldap

    Next you will want to manually create a user with a username that matches active directory. For instance is your AD username is jsmith create a user in osTicket called jsmith and give it a temporary password of 123456 (Doesn’t matter because osTicket will look to AD right?)

    Once that is installed, edit include/class.staff.php:

    >sudo nano include/class.staff.php

    Replace the following code:

    /*compares user password*/
    function check_passwd($password){
    return (strlen($this->passwd) && strcmp($this->passwd, MD5($password))==0)?(TRUE):(FALSE);
    }

    With:osticket

    /*compares user password*/
    function check_passwd($password){
    // Change made for LDAP Auth based on -> http://osticket.com/forums/showthread.php?t=3312
    // Change this line to the FQDN of your domain controller
    $ds=ldap_connect('mydc.mydomain.local') or die("Couldn't connect to AD!");
    // Change this line to the name of your Active Directory domain
    if ($ds) {
    $domain="mydomain";
    $ldapbind = ldap_bind($ds);
    if (!@ldap_bind( $ds, $domain."\\".$this->username, $password) ) {
    // Auth failed! lets try at osTicket database
    return (strlen($this->passwd) && strcmp($this->passwd, MD5($password))==0)?(TRUE):(FALSE);
    // return(FALSE);
    }
    else{
    // Auth succeeded!
    return(TRUE);
    }
    // End Changes
    }

    }

    After you do that change the items in red to match your environment then restart Apache:

    >sudo /etc/init.d/apache2 restart

    Bam! You now have Microsoft Active Directory authentication, and you don’t have to specify a domain name at login either!

    If you are looking for additional functionality, check out the osTicket Forums, there are a lot of cool customizations I am sure you will find useful!

  • VMWare ESXi Hack to Allow SSH

    VMWare ESXi is running on a proprietary version of Linux. This is a fact. Another fact is that in order to do Linux type stuff in VMWare you need access to the console. Now, I know what you are thinking, there is no console in VMWare ESXi. Well my firend, that is simply not true. How the hell do you think VMWare tech support will get in to fix it when you blow it up? If you guessed console, then give yourself a pat on the back.

    There is a secret access into the ESXi console, that is only officially supported if tech support needs to whip out some VM kung fu. Doesn’t mean you and I can’t access it, it just isn’t supported. To access the consol, at the Administration Window press ALT + F2. You will get a black screen, type the word unsupported and press enter. You will not be able to see yourself type. After you hit enter, you will be prompted for the root password. Enter your root password and bammo! You will now have a prompt!

    Well that is cool and all, but we as IT guys want remote console access right? How do you go that in Linux? SSH right? I know what you are thinking, SSH is disabled in ESXi too. Well, now that we have console access, we have a lot of possibilities. One of those is to enable SSH. To do that just follow these steps.

    1. Change directory into /etc

      #cd /etc

    2. Open inetd.conf in vi (I know vi sucks, deal with it!)

      #vi inetd.conf

    3. arrow down until you see #ssh stream tcp…
    4. With the curser on the # type x to delete the #
    5. Type :wq! to exit vi and save your changes
    6. Now we need to find the process running inetd. To do that run the following command

      #ps -a | grep inetd

    7. Find the process number, lets pretend it is 1234. Run the following command to kill the inetd process

      #kill 1234

    8. Now we need to start inetd again

      #inetd

    9. Bam! SSH into your ESXi box!

    Love ESXi? Why not buy an ESXi shirt from the Bauer-Power Gear store?

    VMWare too esxi Know of any other cool hacks to get additional functionality out of ESXi? Hit us up in the comments!

    Technorati Tags: ,,,

  • Clean LUN Space for VMWare

    For the last few days I have been battling disk space issues on the SAN we use for VMWare. A number of the problems were caused because of old snapshots that were not cleaned up, and began taking up all the drive space on the LUN. If a VM takes up all the remaining disk space, that is bad news because it could cause all of the VM’s on that LUN to crash.

    Among the many things I did for drive space, one of them involves optimizing free space on virtual disk drives. This is good for VM’s with thin provisioned disks. If you don’t know what that is, basically you give a virtual hard drive to a machine, and tell it the drive is 20 GB for instance. When VMWare writes the vmdk file it doesn’t create a 20GB file. It creates a file big enough for the VM to use, and gets bigger as needed until it hits the 20GB limit. This way you can host more “large disk” servers on less physical space. It can be dangerous though because one of those virtual disks might actually grow to capacity and ruin it for the rest of your VM’s. Another problem with thin provisioning is that when the OS uses the space, and then later deletes files, the vmdk doesn’t automatically shrink with it.

    There are a couple of things you can do though. If you open VMWare tools, there is a shrink tab. From there you can shrink the free space of the drive. However if you get the message below, it is bad news:

    vmware shrink

    Shrink disk is disable for this virtual machine. Shrinking is disabled for virtual disks not used in persistent mode and other factors. For more information, see the documentation for your VMWare product.

    Well that is no fun at all! It turns out there is a tool that I mentioned once back in episode 18 where I showed you how to wipe a hard drive remotely using email that can help you out in this instance. One of the tools I mentioned was SDELETE by the now Microsoft owned Sysinternals. If you run SDELETE with the –c switch it will zero out your free space, and thus shrink the size of your vmdk! You have to run this within the offending VM.

    sdelete -c

    Know of any other cool tips to optimize LUN space for VMWare? Let us know in the comments!

  • Google Fighting “The Man”

    I stumbled across this today, and just had to share it with you. Google, the Internet giant whose motto is, “Don’t be evil” is fighting the good fight against “the man” by posting to the public the number of requests Google and Youtube receives from Government agencies to remove content from their services, or to provide information about users. They are doing this with their new Government Requests Tool. The tool according to Wired, “…shows the public how often individual governments around the world have asked for user information, and how often they’ve asked Google to remove content from their sites or search index, for reasons other than copyright violation.”

    David Drummond, head honcho of Corporate Development and CLO for Google announced the tool in a blog post earlier today. From Drummond’s article":

    We are today launching a new Government Requests tool to give people information about the requests for user data or content removal we receive from government agencies around the world. For this launch, we are using data from July-December, 2009, and we plan to update the data in 6-month increments. Read this post to learn more about our principles surrounding free expression and controversial content on the web.

    We already try to be as transparent as legally possible with respect to requests. Whenever we can, we notify users about requests that may affect them personally. If we remove content in search results, we display a message to users. The numbers we are sharing today take this transparency a step further and reflect the total number of requests we have received broken down by jurisdiction. We are also sharing the number of these content removal requests that we do not comply with, and while we cannot yet provide more detail about our compliance with user data requests in a useful way, we intend to do so in the future.

    As part of our commitment to the Global Network Initiative, we have already agreed to principles and practices that govern privacy and free expression. In the spirit of these principles, we hope this tool will shine some light on the scale and scope of government requests for censorship and data around the globe. We also hope that this is just the first step toward increased transparency about these actions across the technology and communications industries.

    Here is a screen shot from their tool:

    google government requests tool
    According to the screenshot, The United States is second for the most data requests with 3,580 right behind Brazil. Brazil is also the number one for removal requests with 291. These numbers are the numbers received between July 1, 2009 and December 31, 2009.  Sounds like, with the exception of the Brazilian wax, their really is no good reason to go to Brazil. Their government is t3h $ux!.

    What do you think about this? Do you think this move by Google will do any good in the fight against Government censorship? I want to know how you feel in the comments.

  • Installing Exchange 2007? Streamline the perquisites via command line

    I am frankly getting a little sick of Exchange. Since starting to work at my current company I have managed Exchange 2003, 2007 and 2010. I have performed upgrades from 2003 to 2007 as well as upgrades from 2007 to 2010. I have had my fill of Exchange!

    Well, last week our development team asked me to setup an Exchange 2007 server in their dev environment. Awesome! Another Exchange server I get to setup. Well, I have learned a few things along the way, like how to streamline my perquisite installs by using command line. Seriously, once you have the commands needed, you can write your own batch files to bang out an Exchange install in no time.

    Here are the commands you need:

    exchange 2007 logo PowerShell:

    ServerManagerCmd -i PowerShell

    IIS

    ServerManagerCmd -i Web-Server
    ServerManagerCmd -i Web-ISAPI-Ext
    ServerManagerCmd -i Web-Metabase
    ServerManagerCmd -i Web-Lgcy-Mgmt-Console
    ServerManagerCmd -i Web-Basic-Auth
    ServerManagerCmd -i Web-Digest-Auth
    ServerManagerCmd -i Web-Windows-Auth
    ServerManagerCmd -i Web-Dyn-Compression

    RPC over HTTPS (Outlook Anywhere)

    ServerManagerCmd -i RPC-over-HTTP-proxy

    Know of any other tips or tricks for a quick deployment of Exchange? Hit us up in the comments!

  • Ultimate Collection of Linux and Unix Cheat Sheets!

    I received this tip from my former college instructor and colleague from Coleman University, Thomas Nicholson who is a Network Security master! This will make you really happy if you are like me, and like to split your time in the Windows and ‘Nix worlds. I know quite a few Linux/Unix commands, and I can cd around the terminal with the best of them, but every now and again I can use some help. These are also good if you are not a Linux/Unix guy and have had a Linux server thrown in your lap to manage.

    Well, a blogger by the name of Scott Klarr Jr. has apparently found a really sweet collection of Unix/Linux cheat sheets to help you grep your way to salvation! In fact, this collection has approximately 70 cheat sheets for you  to geek out with!

    cheatsheets

    With the Ubuntu 10.04 release just around the corner, these sheets might be just what you need to bone up on your Linux knowledge to get a jump start on your way to open source.

  • It’s That Time Again! Countdown To Ubuntu!

    As of this posting, the latest release of Ubuntu will be available in 15 days! This is version 10.04 (Lucid Lynx) and brings with it a few changes. The first obvious change is that Ubuntu finally got rid of their s#!t brown color, and went with a more girly purple.

    Never heard of Ubuntu? Here is a short explanation from the Ubuntu website:

    Ubuntu is an operating system built by a worldwide team of expert developers. It contains all the applications you need: a web browser, office suite, media apps, instant messaging and much more.

    Ubuntu is an open-source alternative to Windows and Office.

    Well, if it isn’t out for 15 more days, then why am I writing about it? Well, it is not so much Ubuntu that I am trying to tell you about, it is the countdown! Every time a new release of Ubuntu comes out, you can put a countdown on your site to let everyone know and do your part to spread Ubuntu!


    This year, they have four to choose from:

    Ubuntu counter

    As you can see on the right, I have already put up my counter to show my Ubuntu pride! If you have a blog, or a website, you can too! Just click on the picture above to get your code!

    Technorati Tags: ,,,,

  • Use a Real Guitar To Play Guitar Hero!

    I am not very musically inclined. In fact, my mom put me in guitar lessons when I was younger. I stuck with it for a few months, but then decided that I could play tapes and CD’s easier than i could play an actual guitar.

    Want to know another thing I am not very inclined to do? Play video games! I am probably the worst video game player in the world, which would explain why I rarely play video games. I know, hoever, that many of you like to play games quite a bit. In fact, Bauer-Power’s very own FreedomChicken is quite the anti-social gamer type. I suppose this post is for him then.

    Actually, this post is for nerdy gamers that also like to play REAL guitar! There is a group called OpenChord.org that makes an open source mod for your guitar that will let you play Guitar Hero, Rock Band and the Open Source alternative Frets on Fire with an actual mutha-flippin’ guitar!

    Check out this video from their site:


    How many of you out there or going to try this? Anyone out there doing this yet? Hit me up in the comments!

    [Via Hak5]

  • Will The iPad Blend?

    Saw this on Gizmodo the other day, and I had to share it with you guys. Mainly because I am not a big Apple fan. I am not saying that Apple doesn’t make great products. They do. I just don’t like how friggin’ proprietary they are. For instance, we tried setting up a new Wireless N network at my company using WPA2. Everything worked fine except Mac’s which only support WPA2 if you are also using an Apple access point. Lame sauce!

    That being said though, If someone were to give me an iPad for a review or whatever, I don’t think I can bring myself to decline it. A colleague of mine went out last Saturday and bought one at the local Best Buy. In fact, here is a picture of Bauer-Power on it:

    ipad

    Enough about all that though, and back to why you are here…. Watching the senseless destruction of an iPad! Here you go!


    How many of you out there cringed? How many of you out there cheered? How many of you out there wanted to take the powder left over and snort it? Let me know in the comments!
     
    Technorati Tags: ,

  • Don’t waste money on Blackberry… Get it FREE!

    I have recently been talking a lot about Exchange 2010, and how I am the process of upgrading my company from Exchange 2007 to Exchange 2010. One of the only problems we ran into was with Blackberry. We were using Blackberry Professional Server 4.1.4 and it would not work with Exchange 2010. Our support was expiring, and we didn’t really want to pay to renew. However, we still had a few Blackberry users, so what were we to do?

    Well, lucky for us Blackberry has released their Blackberry Enterprise Server Express for FREE! That is right! It is free baby! This version can run directly on top of Microsoft Exchange if you want and support up to 75 users. However, if you already have a dedicated server for BES like we do, you can support 2000+ users with it. Why the hell would you pay for their full version?

    We installed it, and it is working magically with our new Exchange 2010 server without issue. Setup was easy, and administration is very similar to the full version of Blackberry Enterprise. Another cool thing is you or your users don’t need to fork over the additional cash for Enterprise data plans, any Internet enabled plans will work! Here is a list of advantages from the Blackberry Comparison chart:

    • BESx Works with any Internet enabled Blackberry data plan
    • Free software and CALs
    • Enables businesses to cost effectively expand the number of Blackberry smart phone users while maintaining security and control over both corporate liable and individual-liable users
    • Installs directly on the existing email server if you want

    If your company has been spending money every year on licenses, and support this might be a good option to save a few extra bucks, and spend it in other needed areas of your infrastructure.

    Besides me, are any of you guys using BESx yet? Like it? Dislike it? Afraid to move to it? Lets hear your take in the comments.

  • Episode 20 – How To Flash Palm Pre With Google Android

    You knew it was bound to happen right? I mean WebOS is cool and all, but with all the latest news about Palm’s possible demise you knew it was only a matter of time before someone tried to go out and put a more stable OS on their Palm Pre. Not to say that WebOS isn’t stable, but if Palm goes under, then who is going to support it right? Android however, doesn’t appear to be going away any time soon.

    April is here, and thus is another episode of video Bauer-Power! In this episode I show you how to install Google Android on your Palm Pre. I only did this on the Sprint version, but I assume you can do this on the Verizon Palm Pre plus as well. You will need a couple of things though:

    So what do you think? Are you going to try it out? I want to know your feelings on my Android flashing process in the comments.

    Technorati Tags: ,,,,