evojsn tips me on this Christmas tree rocket launcher featured on BoingBoing. It looks like the 32 rockets are mounted to a Lack coffee table. Woohoo! Pay attention 31 secs into the video. Do you think it’s a Lack? Even if it isn’t, it’s totally hysterical.
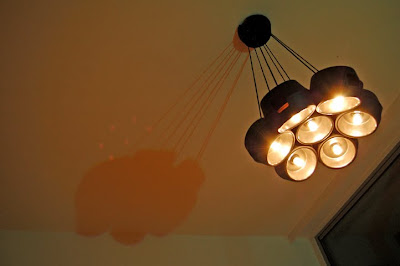
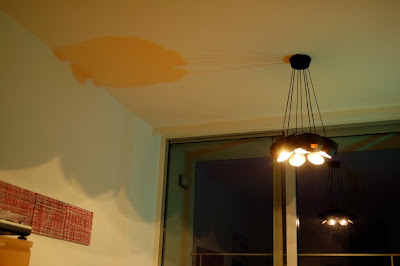
Pieter creates a pendant lamp in honour of his cat. Nice.
He says, “It was created last summer, but it didn’t find a way to the public until now. Since recently, it’s been on display at a designshop here in Belgium. With the nice girls of KAP32.
It’s a pendant lamp made from 15 cat/dog food bowls (Bastis), some lamps and wiring. I named it ‘Bäsil’ after my cat. The pictures speak for themselves.”
Lights, camera, Ikea hack! Romain turns the Ivar side unit into rails for the cam.
“A few days ago, I found out that the Ivar “wooden ladder” was perfect to use it as rails for my cinema dolly! I can now make some nice sequence shots with this 18€ accessory from Ikea.”
Halloween’s over but Adriana still wants to show us her Ikea shopping bag costume. And hear this, she teaches a course on Ikea! Wow. I hope I get an A on that course.
Tote dress recipe:
Take 1 IKEA bag
Make it into a halter dress
She says, “I fashioned the top of the bag and one handle as the neckline and halter for the top of the dress. Then I cut open the seams of the rest of the bag to make a backless, A-Line outfit. I sewed darts in the front and back to be shapely for my bust and back. I cut the long handles off of two more bags to create ties for the back of the dress. Waterproof and ready to tote!
But really the dress is achievable with just one 59-cent bag and by jacking the handles from two more!
Oh, and I also attach a mini-Ikea purse I made with just yellow duct tape and staples from a larger Ikea bag. It is the purse for my nephew’s toy robot to carry his baby robot around town.
I am a professor at the Parsons School of Design and I am teaching a course in the spring called IKEA-ology: Ikea as global urban home.”
This is Glyn’s second, which I think is just brilliant. Compared to his, my Effektiv cabinet with custom drawers recycling corner looks ghastly. Glyn’s does take a lot of space but oh-what-joy to sort and hide the recyclables beautifully.
He says, “In Germany it is required to recycle. You basically need a bin for everything: glass, paper, batteries, plastic and metal packaging, organic waste and the rest of household waste. As you can imagine, for all those bins alone you need to come up with an idea if you don’t want them to dominate your kitchen. Since we only rent an apartment we don’t have much choice of where to put all that stuff. So we’ve come up with the idea of having a recycling cupboard dedicated to the biggest bins.
We took a Akurum cupboard with Applad doors and handles to match our Ikea kitchen. Put the worktop on which is also used in the kitchen and cut two round holes in it. We sealed and glued the inside cut with edging strip which came with the work top. As lids we used some wooden food plates which Ikea sold in the summer and added Ikea door knobs. In order for the lids not to fall through we cut the holes in the Akurum top about 2 cm smaller than the one in the worktop.
Glyn and wife send me two hack. This is the first: a dresser for their dining room and it’s so thoroughly disguised. I would never have thought this cottage chic dresser was previously an Ikea vanilla Billy.
My wife and I are real Ikea enthusiasts. We wanted some sort of dresser for our dining room and didn’t want to pay dresser prices. So we had a go at creating one on a shoe-string budget. First of all we took a plain white Billy shelf and cut it in half. We then had a spare Pax wardrobe top which we got from the Ikea’s bargain basement and fixed that in the middle.
For the back we’ve used some tongue and grove panelling. For the side borders we’ve used some skirting board which we got from the local DIY center. We also got some wood lengths to use them as “plate holders”. The top border was some part of an Ikea bed head (also found in bargain basement). It had the ideal shape for what we had in mind and had to come with us.
All plain wooden items we’ve painted with some white base coat in order to give it a bit of a used look. Also the curtains are made from Ikea fabric.”
***
Voting to end soon!
I forgot to mention that voting for the Ikea Hack of 2009 ends on Jan 15. So, get clicky if you haven’t.
And the polls so far … it’s a battle that may just get wild.
“I wanted to share this hack because it’s so easy to do and inexpensive as well. I have tons of jewelry and was looking for a simple, pretty way to organize them. This really easy hack consists of a white porcelain 365+ series Drom side plate ($3.99) and the Neglinge candle holder (just 49 cents!). I used clear caulk to glue the two peices together (just a couple drops on the edges of the candle holder is sufficient), and now I have a small jewelry stand that I can hang earrings off of and place jewelry on. This hack can of course be done with any ikea plate (there were so many cool ones I had a hard time choosing…I’ll definitely be making more of these with larger plates considering all the jewelry I have) and any Ikea item that can be utilized as a stand.”
After the last 2 years of listing 20 favourite hacks, I’ve noticed that votes concentrated on around 10 hacks while the rest received minimal votes. So with much reluctance I decided to trim my fat list down to 10, again. A shorter list was much harder to do than I thought. It was a delight going through all the entries in 2009 but agonising in having to omit some really good hacks. Probably, your favourite is missing in the list too. Do drop a comment if your favourite is unlisted. I’d like to know your pick.
And with that, here goes my 10 personal favourites (in no particular order). You guys vote to decide who takes the cake as the Ikea Hack of 2009.
Crafty pod with sewing machine
Two Billy bookcases makes one great craft pod. Closes to hide the full shebang of crafty things. Opens up to reveal loads of storage and even space of a sewing machine.
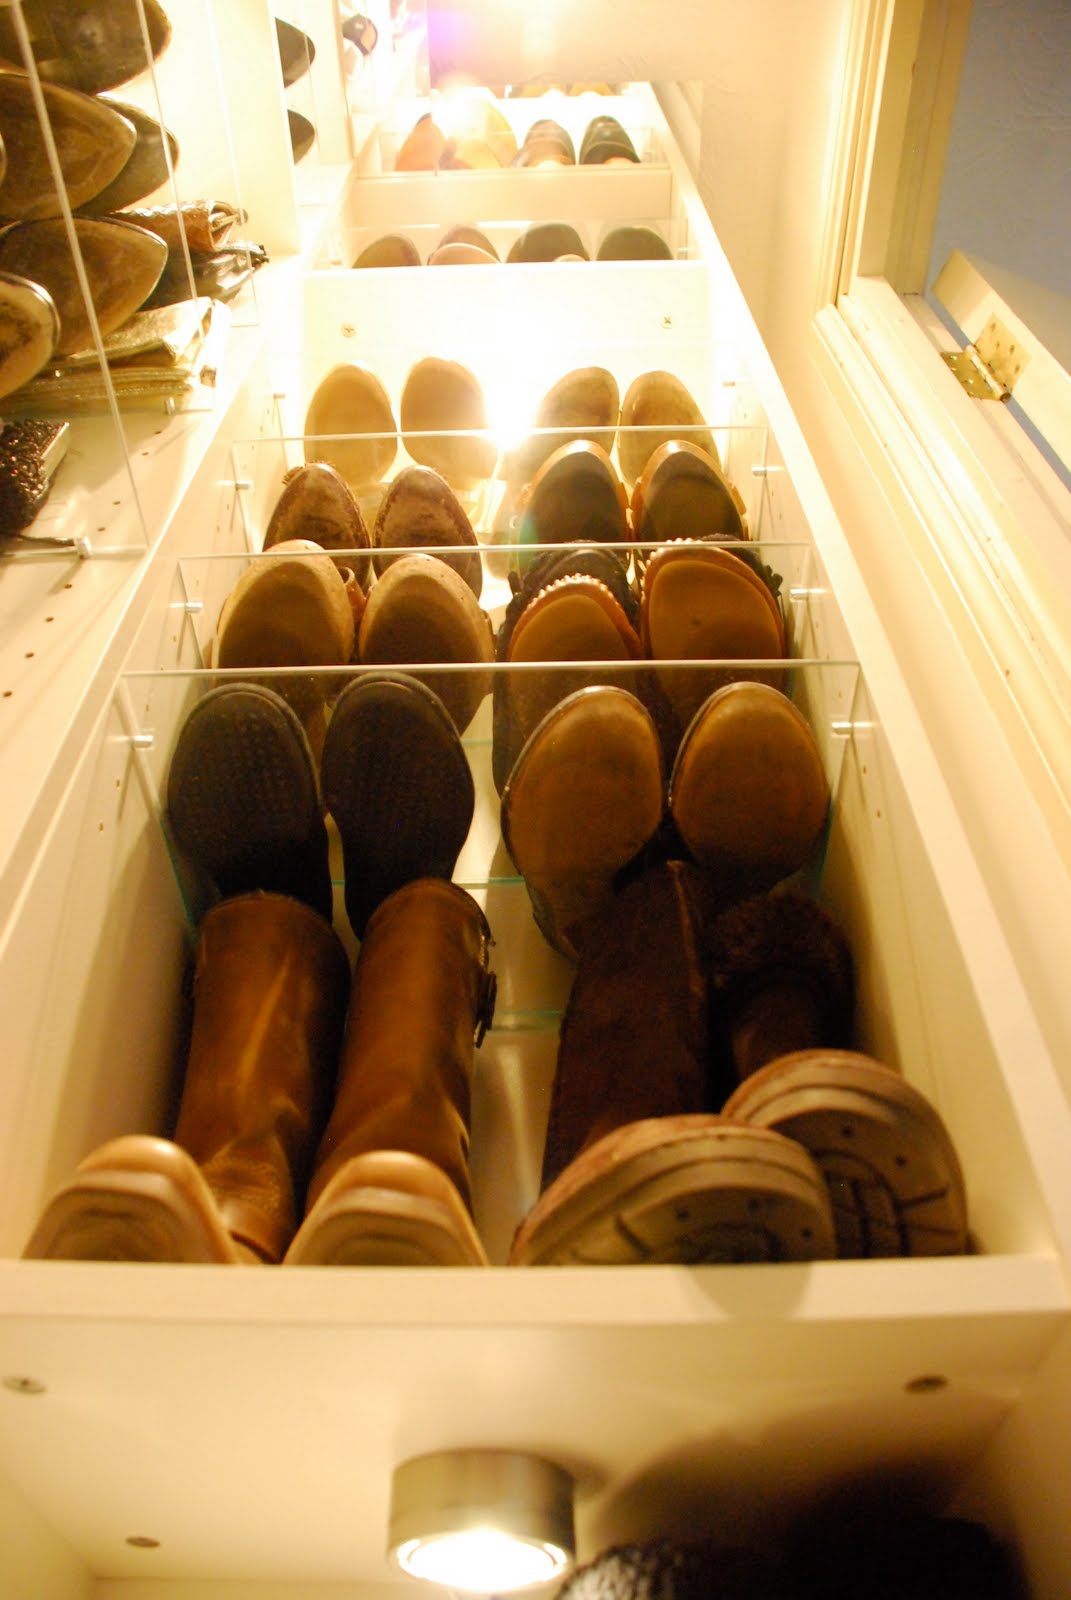
Philip and Cat’s shoe room
The ladies (and some lads, me think) went wild oogling Cat’s shoe room. While not in the league of the likes of Imelda but for us hackers, it’s plenty of storage.
Expedit room divider
The Expedit also makes an impressive room divider. What’s most fantastic about this room divider is its flow. Yeah, we’re talking chi, baby. John added just the right curves to the Expedit and turned it from square to sexy.
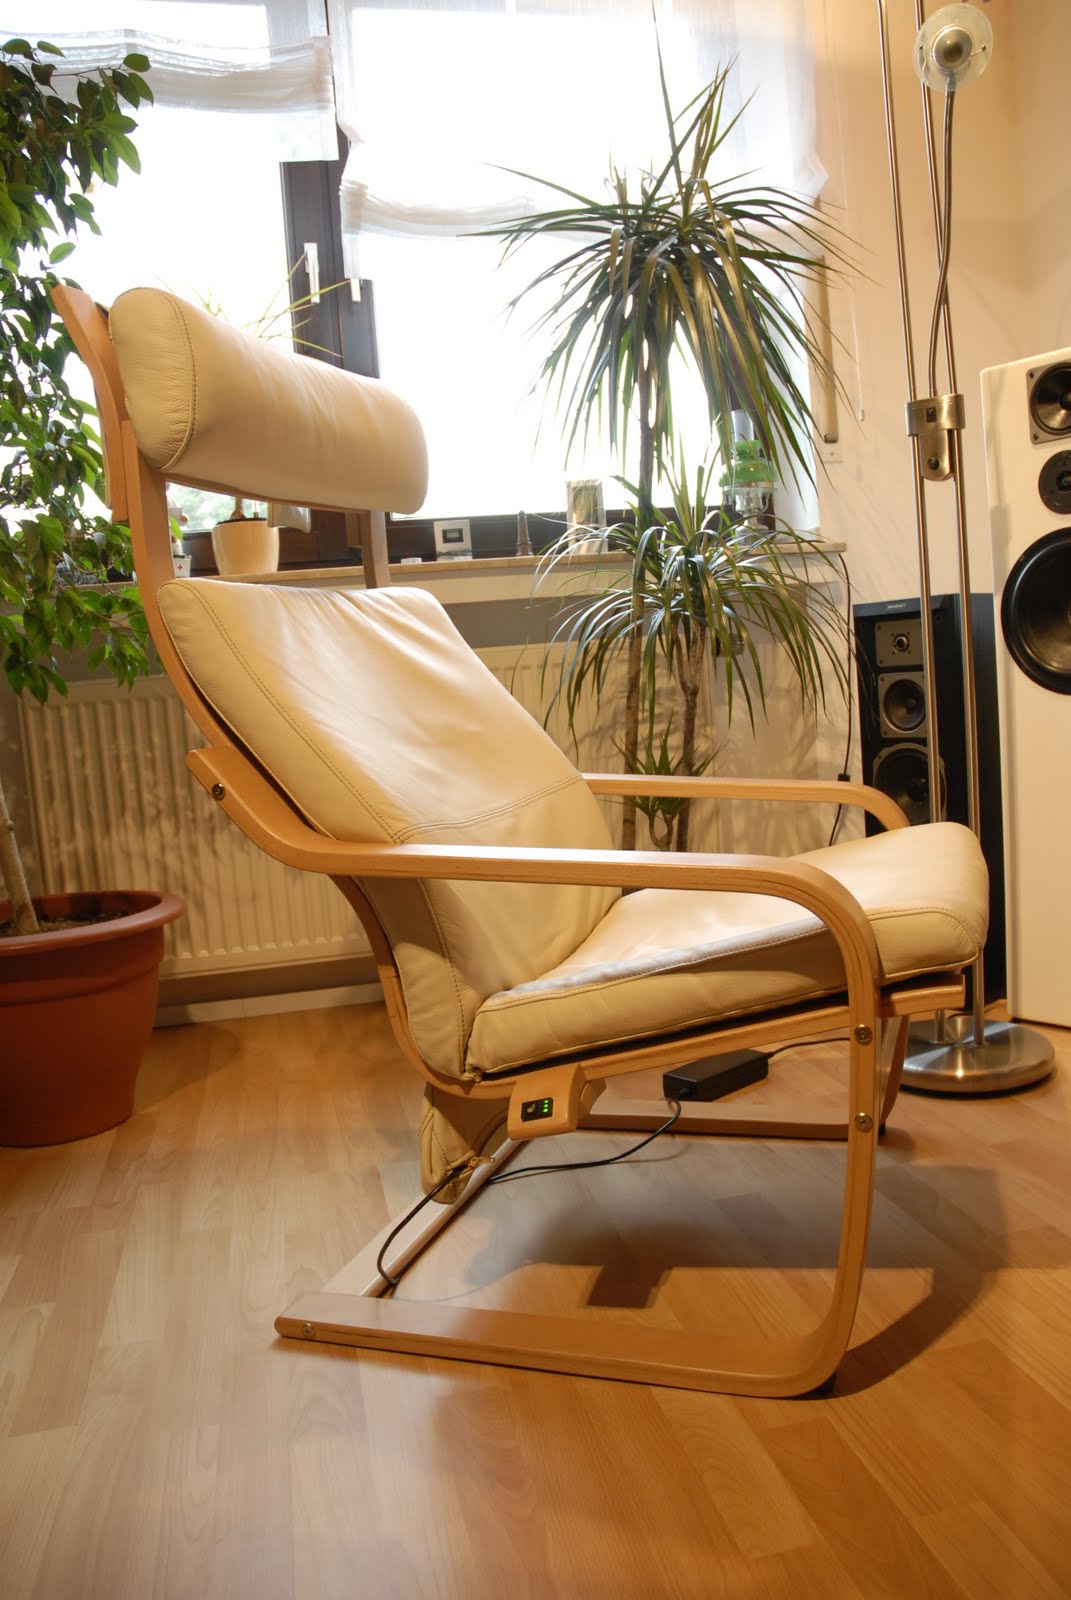
The heated Poang
I like the concept of seatheating in an Ikea armchair. Definitely one of the freshest Ikea hacks I’ve seen this year. The idea of heated seats may not be new but as far as hacks go, it’s new ground.
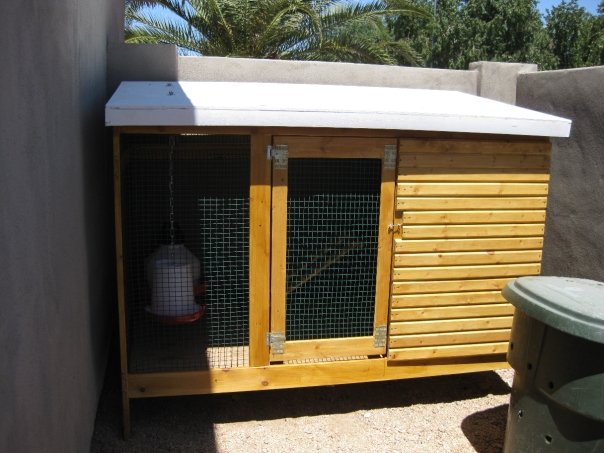
One flew over the chicken coop
This is one hack that totally took me by surprise. Never have I imagined Ikea being used as homes for chicken. Turns out the stuff from Sweden is not just good for us humans but pretty swanky for chicks too.
Rocking Emmabo
I loved this the moment I saw it. I looks way, way better than the plasticky-what-have-you cover that comes with it. Ikea should come up with this for 2010 Summer. Seriously.
Hidden wall cabinet
If Anthony didn’t tell me, I wouldn’t have guessed that a medicine cabinet is cleverly hidden behind the wooden frame hacked from a Nexus cabinet door. Simply gorgeous and so simple.
Happy 2010! Hope you’re taking time out to ring in the new year. Or are you just chilling and playing games? Then, you should check out what Alejandro did with his Xbox. Thanks Rosa for sending it in.
“Recently my friend Alejandro was given an Xbox wheel as a present. At first he wanted to buy a PlaySeat, but it was way too expensive, so he decided to have a look at the Ikea catalog and here is the idea he came up with.”
Alejandro says, “I had a look at the Ikea catalog and decided to buy the following:
The only thing I had to do was to puncture a hole in the Brada support and pass the table’s central leg through it. Then I used a couple of screws to attach the pedals to the Brada.
At first the table was leaning, but I balanced it using the pedals. I’m very pleased with the result! All for about €50 euros or $70! Plus, when you are not using the wheel you have a very comfortable chair to read or watch TV (as you don’t hack the chair or attach it to the table, you can still use it on its own). And even better, the table is adjustable in height, so you can skip buying the Pello, save a few bucks, and use any chair or sofa you already have at home (and then you’d only spend €25 / $20).”
It’s been a good but exhausting year for me. Working solo from home is not as easy as I thought. But still, I wouldn’t have it any other way. I’ve learnt lots running my own freelance writing business. Mainly, how not to be so hung up on work. Ha. To realise that other things are just as important as the next paycheck. Getting my health and fitness back on track, strengthening ties that matter, getting enough sleep … they are easy to overlook when a deadline looms.
Anyways, a woman needs to pamper herself so I will be packing my bags and stretching my legs over at Siem Reap, Cambodia. For a change, I’d usher in the year with a good dose of peace, serenity, and hopefully, a fine flute of champagne. Aaah, sipping the bubbly while my eyes feast on the sight of the sun setting over the famed Angkor Wat. A perfect end to a year well spent.
But before I scoot, thank you for sticking with me through the years. For sending in your hacks, for commenting, for cheering me on, for feedback, for constructive criticisms, for writing to me with your funny Ikea stories, for sponsoring this blog, for making Ikeahacker happen. Big hugs and kisses.
With that, I give you the last hack of 2009. This one’s from Magda of Montreal who sends in her husband’s handsome desk hack.
“Here is another Ikea hack made by my two handymen (my husband and my father) and designed by my mom. We needed a work table for my husband, who is a Mac lover and also a sound designer, so he has tons of cables and some weird machines to do sounds. Our house is really small and we don’t have a room for all that stuff. So we just made a great working space in our family room. It was really cheap since I’m a queen of our Ikea store “as is” section.
The top of this table is made with a headboard of a white Malm bed (found at “as is” section for $10 Canadian!) As you can see on the top (right corner) we drilled a rectangular hole to fit one of my hubby’s weird machine.
The leg is made from an Akurum basic kitchen cabinet. With some shelving inside we were able to hide all our electronic stuff, such as a printer, camera and all the cables needed by my husband. The inside shelf for the printer is a sliding one just to make it easier to print.
Just to make it more appealing in design we placed an Imperativ stainless steel wallpanel (also found in “as is” section) at the front and an Antonius shoe rack (yes, an “as is” item also..) at the back, just to have easy access to our computer and to ensure some ventilation for all the electronic equipment.
The work space , front view.
Sliding shelf for the printer with the stainless steel wall panel on the front part of the kitchen cabinet.
The back panel made of the shoe rack and installed on the back side of the kitchen cabinet (leg of our work station)
Top of the work station with my hubby’s weird machine installed in the rectangular hole made especially for it.
Remo and gang definitely had a white Christmas with an icy hack to boot. The igloo is made out of snow blocks pressed out from the Trofast. Cool alternate use of the storage box and fun to do if you still have snow in your backyard.
“During the last snowstorm we built an igloo in the front yard using Trofast storage buckets as block molds. It turned out really well actually, the only downside is that it was so very temporary, lasting 5 days before the rain turned it into a small sad pile of snow. But while it lasted it was OUR IGLOO.
See details, pictures and a video of Remo’s igloo.
Martina from Austria probably has the luckiest hamster in the world. Here’s the home she built for Sonic the hamster.
“I am an adult keeping a little dwarf hamster. I don’t like the traditional cages – I find them indescribably ugly and also most of them are much smaller than the space recommendations given by animal rights organizations. So I looked for a solution that would provide my hamster with a lot of space to run, high levels of bedding to buddle and give me something beautiful to look at when watching the little furball go about her activities.
After lots of research and planning I hacked a 5×5 Expedit into my dream hamster cage. I got the Expedit used for €50,- and shortened it to 3 rows of 5 columns as the room would have looked too full with another 5×5 Expedit in it. I then added 2 sets of Capita feet (8 feet in total) to get the height I wanted (eye-level when I sit in my chair) and to get a more floating look.
The cage area has a deep area on the left side where the hamster can buddle 40cm (~16in) deep. The right side has less bedding because you have to secure heavy things like stones and wood so the hamster isn’t squashed when she buddles under them. Securing everything with 40cm high platforms or “legs” was not an option, therefore the shallow area. A back plate was added to close the cage and to give more stability I screwed the backplate also to the inner divider plates (esp. the shortened top one) of the Expedit. Air holes are in the top and on both sides. The front of the deep area is plexi glass, the sliding doors are real glass. I then used aquarium silikone to seal all the little gaps between the cage area and the non-cage area so no bedding (or pee 😉 can go through.
I used a set of white Dioder strip lights for the cage illumination plus a red LED christmas light chain so I can choose between white and red light. Hamsters are red blind so you can watch them under red light without disturbing them. (I could have used another colored Dioder but I was too cheap for that. The Xmas-lights were only €5,-.)
The interior also contains Ikea products: the 2 houses were hacked from a Fira set and the little food bowls are actually Glimma tea light holders.
I added 2 red Lekman boxes and some Krus food storage bins for hamster stuff and food. The rest of the space will be filled with office stuff as the cage is in our study and we have a lot of binders.”
I’ll be celebrating Christmas with family and friends tomorrow, so will lay off the computer for a day. For all you peeps out there celebrating too, Merry Christmas and Happy Holidays!
Solangie transformed an Expedit shelving unit into a bar counter for an open kitchen. Nice one.
“I bought the Expedit shelving unit and placed it horizontally. Then went to Home Depot and bought two peace of lumber 2×4 and made a base to bring it up by 7″. Also I got a plywood, cut it to fit the shelving unit (I wanted to hide it and not leave open on both sides) and spray painted the plywood black. I used the Lagan countertop which only cost $40 dollars for 8′. And here is my result.”
More Christmas hacks. This is a classy wreath from Claire.
“I wanted to share my ornament wreath hack with you as I’m very proud (I’m not usually so do it yourself). I bough an Ikea Glansa LED light wreath and large pack of different sized silver ornaments from Ikea. I borrowed my aunt’s hot glue gun and got to work. It turned out much better than I expected and I love that it lights up at night!”
“I bought my sister an early christmas present, a Cyril desk, and instead of throwing out the massive amounts of cardboard, we decided to go green this christmas.”
Sonja is here to spread some Christmas cheer. An advent calendar has pockets of treats for each day leading up to Christmas.
“With December here, I thought I’d share with you the advent calendar I fashioned from a ready-made Wilma curtain.
It simply involved cutting the curtain to the required size and then sewing strips of white fabric onto it in order to create pockets into which the little treats could be slipped.”
Very clever use of the Stolmen poles to create a room divider. Kudos, Andrew!
“An Ikea hack I just completed in order to create a partition in my studio apartment in Greenwich Village.
I used two Stolmen posts as the spine for this partition composed of 8 bowed spars I designed and built across which will be stretched over by a large canvas drop-cloth. The aim was to create a partition for the studio to preserve a separate sleeping area without leaving any trace on the walls, ceiling or floor.
It’s actually quite sturdy and we will eventually hang a painting on it.”
I’ve just realised (quite recently, duh!) that embedded videos, don’t turn up on some feeds. So just for you guys reading this post on a reader, click here to view the video.
This smart idea from Andrew lets you build the Stolmen bike stand on carpet flooring. Sturdy enough to hold two bikes in mid air.
“This Ikea-hack is mainly an extension of a design already featured, that adapts said design to more applications. The Stolmen Bike Stand seemed like such a great idea, I wanted to make a similar one for my apartment. The basic design is the same, with one significant change: an adapter to use the Stolmen post on carpet.
Normally, the Stolmen posts are only good for wood floors, as the post is held by compression between the floor and ceiling. Using the standard base on carpet, the carpet compresses over time causing the pole to become loose and eventually fall (a well documented issue). The version I made eliminates this problem by replacing the bottom connection with a different design.
Instructions:
1. Drill a 1/2 inch diameter hole, 1/2″ deep, into the center of one side of the aluminum round.
2. On the other side of the aluminum round, drill and tap four holes for 1/4-20 thread pattern
3. Install speaker spikes in threaded holes.
4. Use base instead of standard Stolmen base, placing the extendable metal nob from the post into the 1/2″ diameter hole.
This design works because, as you tighten the post (using standard Ikea assembly methods), the speaker spikes drive through the carpet base and into the wood subfloor. This gives them a solid, non-giving, surface and allows the pole to be tightened properly and not fall over.”
Karla finds a litter box solution for her two big cats.
She says, “Originally, the litter box was in our spare bedroom, but a visit from my out of town parents prompted me to build/hack a litter box enclosure that could be placed in another part of the house. We have two large kitties (Stardust and Thor), so we needed something with lots of space. I decided to go with the Varde sink cabinet with countertop.
The kitties enter though the cat flap on the side of the cabinet, walk through an “entry” area lined with a litter mat, and do their business in a large tub.
Instead of installing an entire pet door, I bought a replacement flap and secured it with wood screws. I put a border around the flap to conceal some not-so-straight jigsaw work and to make it look a little more like a door. I used industrial strength Velcro to secure the box to a piece of plastic coated particle board, which I then mounted on drawer slides. The box slides out for easy scooping, and because it’s attached with Velcro, it can be detached from the board for thorough cleaning when necessary. I also cut out three rear vents on the back of the cabinet for ventilation. In addition, I installed two mesh trays for storage – one above the box and one above the litter mat. The tray above the box holds a carbon filter for absorbing odors and the one above the litter mat holds a small hand held brush and dustpan for cleaning up litter.
Overall, I’m very satisfied with how this turned out – litter tracking is mostly contained in the cabinet and odor is pretty non-existent. The kitties love their private and spacious litter box too!”