Author: Jules

  • The cherry blossom lantern

    With Chinese New Year just roaring in in just a few days, this seems apt. This one’s from Joey.

    “Here’s the Ikea hack I did on the Regolit lamp! I needed a soft glowy light source for the corner of my sitting room, but it has got to be cheapest possible, since we are on a budget….and it’s t.i.g.h.t…so I remembered this lantern from Ikea.

    And I personalized it to suit the oriental feel of my home by painting cherry blossom branches on it, then later attached faux cherry blossom blooms onto those branches.”

    See more of Joey’s cherry blossom lantern and other hacks.

    ***

    I also take this opportunity to wish all my Chinese readers (and those celebrating it!) Gong Xi Fa Cai^ and have a merry, food and fun filled one. May all you singles out there get lots of angpows* and your uncles and aunties not pester you about your turn to get hitched (and forever lose your right to free money).   

    ^ well-wishes for happiness and prosperity
    *red packets filled with money.


  • Gorm unit parakeet habitropolis

    Victor and Rachel, inspired by the winning hamster home, hacks a cage for their parakeets.

    “The Hamster House inspired this hack.  We had an abundance of Gorm shelving units and were tired of the look of our traditional bird cage – Blue and Cheesy.  Although the original cage was large, it was not the ideal amount of room.  Our birds, Hamilton and Edith, fly around our apartment on a daily basis when ever we are home (supervised of course) but spend the working hours cooped up.  We wanted to give them a chance to spread their wings when they could and have more diverse perches and toys to play with.
    We modded the Gorm Unit by putting 2 of the five shelves upright on the back to maintain support and cut the cost on the amount of hardware cloth we would need.  Both sides open up entirely and were built out of spare wood from other projects.  We attached Green Hardware Cloth (10 Bucks a Roll from Home Depot) via staple gun to the interior and made a smaller bird access door.  The Hardware Cloth on the face is attached with open Eye Screws so the entire face can be removed for an easy move.  The entire habitat is relatively light and birds love it so much it is difficult to coax them out (adjustment period I suppose).

    We also place linoleum tile on the bottom that can easily be removed and cleans much easier then dealing with the bird cage tray.”

    Other pet hacks:
    Rats chill at the Kullen
    Turtle terrarium
    Guinea pig palace
    Besta bunny hutch
    Ivar cage for degus
    Antonius chicken coop


  • Kitchen work station

    Courtney goes to work and help hacked a kitchen work top from Lack side tables.

    “My brother and sister-in-law moved into a larger apartment last month, an apartment with a much bigger kitchen, but still very little cabinet/counter space. Thankfully there was an empty wall to utilize for an ikea hack.

    We bought four lack side tables and found an approx. 5 feet long counter top in the ‘as is’ section at Ikea…

    We built the work station starting with attaching two table tops to the bottom of the counter top and from that, we started to assemble the rest of the tables and built the hack from the (counter) top, down.  They have an oversized silverware tray that needed a home, so once the hack was finished, my brother took an unused keyboard tray off of their desk and attached it to the work station.

    This work station is surprisingly sturdy!  It doesn’t move unless you are intentionally trying to move it.  It’s the perfect height, being just a tad taller than an average counter.  The counter top was from the ‘as is’ section, so it isn’t perfect, but paint hid a lot of the minor imperfections.  All in all, this hack was a huge success and totaled only $60!”


  • Side chairs into mid-century-ish club chairs

    Tim gives a new mid-century twist to these side chairs.

    “I’m not sure what the Ikea name for these side chairs is, but they were old and wobbly and the back legs were breaking off. I made a simple base out of 2×10’s and used the original arms from the ikea chair as a curvaceous way to hold up the back and keep it strong. My wife, Susan, stitched up …

    … the leather slip covers based on the old (removed) ones. She actually used some leather from a discarded Ikea leather upholstery sample. Now they’re comfortable, low armless loungers.”

    the old Ikea armchair


  • Play kitchen from Benno TV unit

    Nadine made a play kitchen for her daughter, Katharina, over Christmas. Here it is.

    “We wanted to make a kitchen for our daughter. The basic is a Benno TV. We used many things from Ikea – I do not know all the names but everybody who likes Ikea will know the things.

    For example the washbasin and the cutlery drawer is a bath set we bought some time ago. We changed the left drawer and put a board on we bought and made it into the oven. The hotplates are cut from a trivet bought at Ikea. With some colour and sewing 4 towel from one Ikea towel the kitchen gets a very sweet style.

    We are very proud of our first hack and our daughter loves to play with her own kitchen!”


  • Bathroom shelves into a pot rack

    A massive pot rack from Dave.

    “I built a pot rack from Ikea bathroom shelves. Took 2 shelves, assembled them, flip them upside down, build a oak box around them, fasten them to oak frame with both a screw in the lower flange (what would have been the top flange).

    Also added a top and bottom brace inside the oak frame for support, then attach to the ceiling with eyebolts into the ceiling joists attached to wire and turnbuckles. It was a great simple project. I added the Ikea hooks to hang pots underneath as well.”

    Related hacks:
    Omar pot rack
    Stolmen vertical pot rack


  • Molger Cabinet and Bygel rail for the bathroom

    Here is another two from Jari B. This time it’s his bathroom.

    Molger Cabinet: Two pieces for the price of one.

    “I purchased this now discontinued Molger cabinet, for the sole purpose of removing the sliding mirror from it and using it as my bathroom mirror. I’d been looking everywhere for a new mirror, and this was the one.

    This mirror fit perfectly in the unusually narrow grotto formed between two columns in my bathroom. The rich wood finish was exactly the color I wanted. The fact that this piece was on sale at a clearance price, didn’t hurt, either. To mount the mirror, I used tiny 3/8 wood screws to attach a 2 keyhole type hangers to the backside of the frame.

    I wasn’t sure what I was going to do with the rest of the Molger cabinet, but in the end, I decided to hang it over my desk and use it as wall shelf to hold miscellaneous office items. My apartment has very low ceilings and is quite small so the Molger cabinet’s mirrored back helps give the illusion of opening up the space a bit.”

    Bygel in the bathroom

    “I needed a towel bar to replace the cheap and crusty hardware store fixture that came with my apartment. I liked the stark industrial lines of the Bygel rail. I needed to modify to get it to work, however. I cut some wooden blocks, which would allow the 21 3/4″ wide rail to be mounted over the inset molding panels on my bathroom door. The wooden blocks also serve to help push the rail out from the door another 3/4″ which gives just the right amount of offset to comfortably hang a thicker folded bath towel. Unmodified and mounted directly, I felt that the Bygel rail sat too close to the surface to easily hang anything but thinner dish towels or washcloths.”


  • Borris mat modular carpet squares

    Jari B needed carpets and found a cheap solution using Borris door mats.

    “I needed some kind of floor covering for the kitchen area in my tiny apartment, and having recently moved, I’m on really tight budget at the moment. My kitchen is right near the entryway, so it’s also serves as a high traffic area. I wanted something durable, perhaps indoor/outdoor, washable, and that could withstand the abuse of high traffic and the occasional kitchen mishap.

    I also wanted something with a dark muted tone, a modern utilitarian aesthetic and hopefully cost $30 or less. Although I love the look of sisal, these aren’t cheap, and my past experience has been, one errant glass of wine and they become permanently tatooed. Nappy style carpeting in the kitchen is a little, ew to me.

    I was in my local Ikea browsing the rug section, and not really liking any of the available options, when I spotted a big pile of  these $1.99 Borris door mats. I immediately thought I could repurpose these into modular carpet tiles, similar to the more pricey FLOR carpet tiles that CB2 sells. The Borris mats seem durable, are hand washable, have a grippy latex backing that really helps keeps them from sliding, and on top of it all they have a really nice subtle stripe texture, and an attractive charcoal/navy muted color.

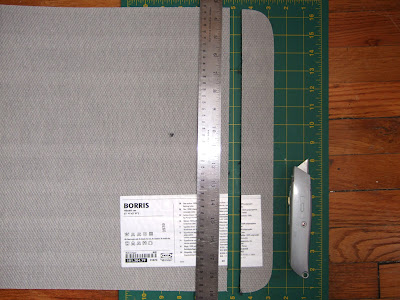
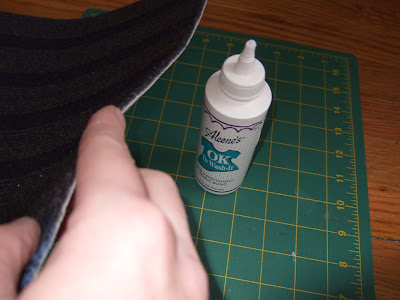
    For this project: I marked and trimmed 1 3/4″ strip off of each side of mat to remove the rounded corners using a sharp utility knife- a brand new blade helps. I wasn’t sure if fraying was going to be a problem, so i carefully dabbed a tiny bit of Aleenes clear washable fabric glue along the cut edges with my finger,  which should prevent any fraying. For my sizing purposes I chose to leave the mats as rectangles rather than cut them into perfect squares, like the CB2 tiles. The only other thing I did was run a strip of gaffers tape on the back of mats along the edges to help keep them together. For my kitchen project I used 8 mats which cost me a total of $17.33 including tax.

    I’m happy with the way this project turned out, and it’s huge improvement over the bare, creaky old wood floor. I’m sure my downstairs neighbors appreciate the extra soundproofing as well. The rug also helps to psychologically demarcate the kitchen as a separate area of my home, as it shares the same room as my home office and bedroom.”


  • Lab bench from kitchen cabinets

    Ikea has been trying to beef up use of their products in offices for some time now. So, am glad to see it happening. Chris and his team hacked a freestanding lab bench that looks custom built.

    “I have been doing stuff like this for years at home and work and am glad that it is being showcased. I work for a product development company called Daedalus – we develop a lot of medical, lab and safety equipment for all kinds of companies. As part of our development work, we often need to perform research or functional testing on the equipment we design so we built ourselves a dedicated testing lab/room.


    However, when we wanted to furnish it out with some nice looking, freestanding lab benches, we found that there weren’t any that could be had for any reasonable price. So we pulled up Ikea.com and went to work.

    What we came up with was a design for a free standing lab bench that is 60″L x 30″D x 38″H, has lots of storage and is solid as a rock. It is composed mostly of Akurum cabinets – one deep base cabinet flanked by 4 shallower wall cabinets. These are bolted to each other and to a 2 x 4 base frame that we built to give it a good foundation.

    The wood base is clad with some aluminum bar stock and the whole thing sits atop 4 Capita legs. We topped it off with a heavy duty laminated top from Global Industrial and even wired it with 4 GFI electrical outlets so power would always be at hand. Attest cabinet pulls and some cheap extruded label holders with some lovely in-house designed labels added the finishing touches.

    We made two of them at the same time but are now thinking of making some more since we like them so much. We have had them about 2 years now and they are holding up really well. While they have been real work horses, they have also added a polished look to what is an otherwise pretty industrial space.

    We are also getting started on hacking together all new desks for the whole office. We are working on a design that would have a long cantilevered work surface hanging off both sides of a 5×5 Expedit book case. If they work out well, we’ll send some pics your way.”


  • Fret not, use an Ikea pencil

    FloMac, Caroline and Maria tip me on this hack seen on There, I Fixed It.

    FloMac says, “I’ve just seen this hack, it’s like a Lapicientos hack!”


  • The Lack rack hack

    This LackRack hack is from the eth0 community in the Netherlands. They have an interesting hack to house a modular datacentre, sneakily under a Lack side table. Now, if only there’s a solution for all those wires!

    “The LackRack is the ultimate, low-cost, high shinyness solution for your modular datacenter-in-the-living-room. Featuring the Lack (side table) from Ikea, the LackRack is an easy-to-implement, exact-fitdatacenter building block. It’s a little known fact that we have seen Google engineers tinker with Lack tables since way back in 2009.

    This one is different. During our last LAN ‘party’ (eth0:2010 Winter) we’ve used the Lack table as a 19″ rack you commonly find in data centers. We call it the LackRack and you can find more info on it on our
    wiki page and at http://lackrack.org.


  • Lapicientos, pencil holder

    I love this one. It’s the first hack I’ve seen on the Ikea pencil. A pencil holder from pencils!

    “We are 2creativo, a graphic and industrial design studio from Barcelona, Spain.

    We have an old hack we made 6 years ago, as we had to visit Ikea several times. It all came because we started collecting lots of pencils they give for free in Ikea, as we thought it was great to have a free material. And we said: we have to think what we could make new out of them.

    One day, we got the idea to create a pencil holder made out of pencils. We attach you the final image and how we made it (extremely easy!).

    It’s name is “lapicientos”, a play on words in Spanish: lapicero (pencil holder) + lapiz (pencil) + cientos (hundreds).”


  • Rats chill at the Kullen

    Hot on the heels of our winning Hamster Haven is a Rat Palace! Check out this Rat enclosure from Yvonne.

    “I bought my Ikea Kullen closet and turned it into a rat cage. Most standard cages are too small, rats like to run, climb and explore. I put in 4 levels and connected the bigger part of the closet with the small part on the right.

    The tunnels are made of Nöje.

    The houses are made of Försiktig

    The toilets are Trofast drawers.

    The blue box on the second floor on the right side and the two smaller ones attached to the left door are Fabler.

    And the blue little punnets are also from Ikea, but I couldn’t find them on their website, they were on sale when I bought them.”


  • Besta toy storage

    Elena and Markus are total Ikea addicts who hacked this Besta storage for toys.

    “We bought two Besta shelf units last spring and wanted to use them to store the kids’ toys in the living room.

    Unfortunately you cannot have this unit with two drawers, because the drawers are a little less than half the height and a little more than 1/3, so it just does not work and we went for the drawer+door solution with Grip handles for the drawers on top and push latches for the doors at the bottom.

    It turns out that those push latches are not so easy to open, especially for kids and also that those Norum doors are so wide that the hinges cannot really hold them up properly, so the whole thing did not look really nice, with the doors at the bottom hanging down in the middle.

    So, inspired by this hack we bought 4 Inreda drawers without front and had a carpenter fix the Norum doors to fit the drawers!”


  • Gustav desk with Billy shelves

    Jessica pairs the Gustav writing desk with a hack on the Billy extension units. And it worked out perfectly.

    She says, “Living in a small house, my husband and I recently found that the Gustav writing desk was a perfect replacement for a desk that was way to big for the space.  The Gustav fit perfectly on the 45 inch wall available.  The problem?  No hutch or storage space.  We went to Ikea looking for a cabinet to mount above it but most were either 36″ (too short) or 47″ (too long) and we wanted a perfect fit.

    We created a custom overhead unit from two 14″ wide Billy cabinet extension units, four wooden extra shelves, two doors for the units and a couple of glass shelves.  Since the extensions are intended to fit on top of a Billy bookshelf, they had no bottoms.  We used two of the extra shelves to create bottoms, attaching them to the sides of the Billy using Kreg pocket screw joining.  To make the cabinet exactly the right length we cut down the remaining two extra shelves and used them to create an open shelving space in the between the two cabinets.  The were also attached using pocket screws, but L-brackets would also work if you don’t have the kit to drill pocket screw holes.

    To mount it to the wall, we flipped the entire thing upside down so that the more nicely finished “top” of the unit would be what you would see from the desk.  This also allowed the unit to be attached to the wall through the bracing bar that would normally be at the bottom of each of the Billy extension units.   Because of the plaster walls and odd stud placement in the wall, we also attached a 45″ piece of poplar (which matches the birch finish very well) to the wall to help support the unit.  We attached the doors and added a couple of glass shelves and now we have a perfect fit for the space.  After our next trip to Ikea, we also plan to mount some lighting underneath.”

    ***

    Meet me on Facebook
    I’ve recently created an Ikeahacker fan page on Facebook. I don’t spend a lot of time on FB but I thought it is another great way to reach Ikea fans who are also avid Facebookers. So, if you do Facebook, I’ll love to  connect with you over there. I’ve also added photos of my recent trip to Siem Reap. Yeah, just a spot of me cam-whoring. Take a look, only if you’re interested.  


  • Kiss box

    Anja from The Netherlands was made for lovin Kiss. Check out the rock and roll Kiss box.

    Anja says, “This is an Ikea box, Trissa, for LPs. It was white, quite boring. I’ve got the album Dynasty by Kiss, so I looked for some good pictures on the internet of the men of Kiss. Then I worked on them in Photoshop till there were only a few colours left (white, black, red, glitter). At first I wanted to make a template so I could spray the paint with an aerosol. But the pictures were too detailed to cut out. So I ended up drawing the pictures with a waterproof pen. For the glitter I used mirror foil. I used the template to cut out the foil. On the internet I sought a free Kiss font and in Photoshop enlarged it to the correct size. Printed out, and cut it out in the mirror foil. Et voila a rock ‘n roll Kiss box!”

    See more of Anja’s Kiss box.


  • Ikea boxes as art supplies

    I bought a few of those shadowboxes too and am also heartbroken that they are no longer available. Here is what Michelle’s husband did with his collection. She also shares a simple idea for a sensory table for infants.

    Ikea art
    Michelle says, “I thought I would share some art that my husband made using old Ikea shadow boxes. Unfortunately, the shadow box is now discontinued (sigh) but it was able to be used in many an art project between my husband and I when it was available. My husband, Matt Ritchie, used them to make 4 by 6 inch dioramas. Using hand cut wood acrylic paint, and the Ikea boxes. The boxes used to come with a heart or key inside, and were really hard to open since the glass in front was glued in. We had to tap (well, pound) the box on the ground to loosen the glue, and the glass would usually come out pretty easily. Anyway, I hope you like these little art pieces!

    Rast sensory table
    “I turned this little Ikea nightstand (Rast) upside down and excluded a shelf so i could add a small bin to it and make it a sensory table for my infant/toddler class. I put different sorts of sensory objects in the bin, like flour, dirt, sand, oatmeal etc, and the kids love to pour them from one cup to another. the shelf was just the right height for the toddlers in my class, and I made all four for way cheaper than one pre-made table. Then I used acrylic paint to add the flowers on the sides!”


  • Congrats to Martina and Sonic the hamster!

    Martina’s Hamster Haven led right from the start. The Chicken Home put up a fight but in the last few days of the poll, the Ham pulled away and took home the trophy. The Hamster Haven wins at 28% of votes, with the Chicken Home coming in second with 21%. Thank you, thank you everyone for joining in the fun and voting. For her effort, Martina wins a gift card from Amazon.

    Click here to view results.

    ***

    I want to thank the good people over at AT who voted Ikeahacker as the best Home Tech Blog of 2009 in the Homies. Wow. What an honour to be on the same page with insanely cool sites like LifeHacker and CoolHunting.


  • A lighting hackea

    A simple light hack but one that helps Stefan save energy.

    We have a dining room table light (not made by IKEA) which has 5 E14 fitting type bulbs. The original bulbs were 25W a piece, which adds up to 125W total.

    Trying to reduce our energy usage I decided to replace with the 5W Sparsam CFL’s. At first it didn’t look too pretty.

    The solution was simple: spray-paint them to a matching color and so the label text isn’t visible anymore. The result: energy usage dropped from 125W to 25W. On the last picture you can see lights 1, 2 and 5 have been replaced with the Sparsam bulbs, lights 3 and 4 are original (for comparison purposes).


  • PS vanity

    Floating vanities are absolutely gorgeous. I would love to have this one from Jenni.

    She says, “This cabinet is in our bathroom. It is a white PS cabinet. The legs were removed, then painted with white gloss enamel to get a true white (original white is cream in colour). It was attached to the wall from the inside of the cabinet, so no legs required and at the height we needed.

    We had a piece of chocolatey timber cut to cover top of cabinet with a little overhang, hole cut out to drop basin into and finished with a 2pac seal for waterproofing. Sink hole was also cut into the top of PS, then the timber lid was attached to cabinet. Next was securing in sink and plumbing in tap mixer. It is working very nicely.”