Author: Jules

  • Have a cocktail on an Ivar bar

    When Steve sent me these photos of his Ikea bar hack, my first thoughts were, “Where’s the Ikea?” On closer scrutiny, yes, it’s there, hidden under layers of Home Depot panels.

    A few years ago, I moved into an apartment with built-in bookshelves, and didn’t need my Ivar system shelves any more.  So I built a bar cabinet out of them!

    First I stained and finished them to match the dining table, and installed a stemware rack from The Container Store.  The enclosed sides, swing shelf, and back panel are all wood I had cut at Home Depot or a lumber yard.  The halogen lamp kit is from Home Depot, too, as is the majority of the hardware.  I secured the middle three shelves to the frame with L-brackets so I wouldn’t have to worry about a crashing-glassware disaster.  The glass-door Ivar cabinet at the bottom holds more stemware and barware.

    I’ve mixed many a drink on that swing shelf and now I’m in a different apartment with a different dining table and bookshelves (Billy, of course) – but the bar came with me!”


  • Nordby TV bench turned into towel rack

    I’ve definitely never thought of using the Nordby TV bench as a towel holder. But Susanne sure did.

    She says, “It did not involve much ‘hacking’: just turned upside down and hung with two solid brackets on the wall.”

    If you read German, she writes about her TV unit turned towel holder here. Click here for a google translation to English.


  • A little Trofast experiment

    Tobias experiments with an alternative to the Trofast frame. The original is made from solid pine but this could be just a sturdy (since Tobias can stand on top of it). If need some thing cheap to go with the tubs, which cost only $2 – $5, this may fit your budget.

    “I’ve always been intrigued by the Trofast plastic tub/drawers, but the $50 – $90 cabinets seemed a bit overpriced. So I knocked together a simple frame out of 1 x 12 to hold some of the drawers.

    Instead of routing out tracks for the drawers to slide on like Ikea does (a nice design, but I don’t have a router), I cut strips of 1 x 2, which also reinforce the corners of the open frame. It’s screwed and glued with Gorilla glue, and I can stand on top of it. Total cost of lumber, drawers, fasteners and glue was less than $20.”


  • Lack spring table

    If you’re looking to add a splash of colour for Spring, here’s an easy and cheap way to do it. Sandra shows us how on her Lack bedside table.

    I took a white Lack side table I had and some post cards (from postal free), glued them on the table and bought a glass piece to put on the top.


  • Lack retro media cabinet

    I’m loving what Jeff in LA did with the Lack shelving unit. The sliding doors and hairpin legs are just perfect.

    He says, “After discovering your site and seeing some of the other lack media cabinet hacks, I thought I’d send some photos of my own. Yeah, I know, I need to do something to hide those wires between the TV and the cabinet.


    My materials were:
    1 white Lack shelving unit
    1 12-foot dual-channel aluminum rail guide from a local cabinet hardware store
    4 stainless hairpin 8″ legs from Ianmaclean.com
    A piece of 1/4″ scrap plywood I had laying around
    Raw walnut veneer
    Watco danish oil
    Spray adhesive
    Two 2″ brushed nickel sliding-door handles

    Tools:
    A jigsaw
    A utility knife

    It was pretty straightforward.  I cut the aluminum slider channel into two sections matching the interior length of the cabinet, and screwed them in.  I measured and cut my plywood into two long doors, then cut the walnut veneer into matching sheets, but slightly oversized.  I sprayed adhesive on the plywood and the back of the veneer, then stuck them together and trimmed the excess veneer off the edges.  I rubbed them with Watco danish oil and lightly sanded them with very fine sandpaper to give them the rich color.  Using the jigsaw, I cut 2-inch holes in the door panels and pressed in the circular handles, securing them on the backside with a glue gun (I could have used the tiny nails that came with the handles).

    Usually, the slider rails are sold as separate upper and lower guides where the upper guide is twice as deep, allowing you to make shorter doors that can be lifted up and out for removal.   But I wanted the aluminum rail to be as low-profile and invisible as possible, so I used the shallower lower guide for both top and bottom. Plus, I was a cheap bastard and this saved me from having to spend another $35 for another 12-foot aluminum track.  So these doors cannot be lifted out for removal.  I loosened the screws on the lack cabinet, fit the doors in, then re-tightened the screws.

    One snag was that my sheets of plywood were just thin enough to fit in the slider channels *before* applying the veneer, so with the veneer on they were too thick and snug to slide easily.  So I had to spend some time sanding the edges on the back side of the doors to thin them up.  In retrospect, I should have just bought some even thinner (maybe 1/8″) board.”


  • Kitchen pantry from scratch ‘n dent cupboard

    Edward turns a pile of as-is wood into kitchen storage.

    “I recognized a pile of wood in the scratch and dent area as a cupboard, which I think was from the Akurum series. Our tiny kitchen was desperate for some extra space, so I bought the wood, for I think $5, a set of Vika legs, which were easily shortened with a hack saw, and turned the cabinet on its side, re-cutting the original long horizontal cross shelf into shorter lengths for the new orientation. A little paper inside the glass doors hid the brick-a-brack and it was done.”


  • Kid’s play storage

    Well, you’ve built your kid a play kitchen. It’s only a matter of time, you’ll need to add a cabinet to it. Sergio builds one from 2 Rast bedside tables. Nicely done. Ikea should consider a grown-up version of it.

    The tables are stacked one on top of the other, with the bottom one turned upside down. Sergio did quite a bit of work securing both tables together and ensuring they align. The doors are specially cut from planks, with hinges added.

    Fill the cabinet with kiddy goodies and it’s all set to go.

    See instructions in Italian or a Google translation to English. Click this link to see the cabinet in action.


  • Get into the details for your home office

    It’s the details that make the whole ensemble work. Matching the colour, lifting the bookcases. Small touches, but nicely done. Take a look at Jennifer’s home office.

    1. Expedit shelving – 2 vertical, 1 horizontal. My hubby went to Home Depot and got unfinished furniture legs, took a door to the paint department to match the color, and painted the legs to match. We wanted the shelves to look more like furniture by lifting them off the floor.

    2. We bought Vika Fagerlid legs and Galant system table top, and ordered from local glass company to fit a glass on top.

    3. Then, of course, the newest stools available, Egil stools, which are very comfortable!


  • Hang your TV on a pole

    Gerry wraps a TV round the pole. Sexy than this 2-pole version I received in 2006. Guess with the sleekness of LCD TVs nowadays, you can do away with the extra pole.

    “I wanted a TV stand to mount my 32” LCD. I fabricated the two rails that attach to the TV from steel shelf bracket vertical rails. It was just a matter of drilling three holes in each rail to match the TV mounting holes and a center hole for attaching to the Stolmen pole. The angle bracket is from a Stolmen clothes rail installation kit.

    I assembled the unit on the floor with the back side up to make it easy and then lifted it into position and secured it. Cables are enclosed in Ikea Montera plastic cable holder that is attached to the back of the Stolmen tube.”


  • Asker hanging liquor bar

    Here’s one from a contributor who rather not be credited. He says, “I used Ikeahacker for ideas a lot when I moved, and thought I ought to at least contribute what I came up with.” Thank you! 🙂

    Constrained for space and renting (so not wanting to make big holes in the wall) I decided to hang everything I could in the kitchen.  This included hanging pots and pans over the entrance to the kitchen (careful to hang the small ones over the passage to permit passage for up to 6’3″), and the Asker suspended liquor bar hack.

    I piggybacked off the studs holding up the cabinet to hang an Asker bar, and three Asker dish drainers. Using left over pilasters from a shelving project, I added wine glass racks to hang underneath. Voila! Extra storage for glass, liquor, wine, and a reminder to drop-in guests to accept the offer of a drink. It’s not cheap ($90 for racks, $15 for the bar, $18 for the wine glass racks), but cheaper than any alternative I could find.”

    Related hacks for your drinks:
    Lack bar hack
    Party with this home bar
    Hutten wine storage in an Expedit
    Expedit wine rack
    Above the fridge wine storage (see no. 5)
    Cheers! It’s a Kegerator


  • Knife drawer with glue and wood!

    Laura shows off her chops. I can’t imagine what all the knives are for. (A ninja? Heh.) I only use one to cut everything, from apples to zucchinis.

    She says, “Ikea recently discontinued the little knife-holder plastic inserts for their Rationell drawer divider… just when I was redoing my kitchen and wanted to put all my sharp things away! Anyway, I tried to purchase a ready-made knife holder drawer (but it is really expensive to have it ship to Italy!)

    I made my own and during the process I discovered that it was even easier than I had thought. I measured my longest knife blade for the length of the long slats, and steak knife blades for the length of the short slats. I began to hot-glue the slats on the Ikea rubber drawer liner to line them up and prepare them for screwing, from the other side…. but I discovered that the hot-glue fused fully with the rubber of the drawer liner and greated a very strong hold. So… all I did was just glue the little lengths of wood and spent a total of €5 in materials. Here’s how it looks without the knives.

    Related hacks:
    Simple knife stash away
    Refrigerator knife holder


  • Sliding panel curtain door

    I love this idea from Rafaela – replacing the curtain panels with fabric of your choice. Would be great as a room divider, wardrobe doors or to shield away a messy work station.

    She says “I did a panel for my closet door using Ikea fabric. I love Ikea’s fabric and I wanna to do everything with them!”

    The Kvartal hangs the Inger fabric beautifully.

    See more of her fabric wardrobe panel. She’s also completed some minor hacks, like her Ikea entryway bench and fabric art.


  • Besta room divider for a loft

    Dividing up the room is a key to good use of space. It also does double duty as storage. Kevin does just that with the Besta in his loft.

    It’s for clothes storage and to screen off the bedroom section of the loft. The only problem was the original Besta configurations didn’t fit, being either too tall or short.

    Kevin writes, “So instead of using the top cabinet module they offer we used their shorter matching drawer front, attaching them with hinges to a custom built frame we installed on top of the Ikea Besta unit made with basic materials from a hardware store.”

    The back half was finished with white mdf panels and turned out to be the perfect place to hang a TV.

    See more of Kevin’s Besta room divider and storage or flickr photo set. Also check out the video tour of it.


  • A Hol for kitty

    We’ve also seen this hack before. But again, this is using the smaller Hol. Small space kitty solutions, eh? The Hol disappeared for a season but seems like it’s back. Whether permanently, I don’t know. If you’re thinking of hacking a Hol cat box, get it quick. With it going for only $30 a piece, it is definitely a great bargain compared to what’s in the market.

    Now to the hack. Keri (and Teddy) recently moved to a new apartment, with a fabulous fitted kitchen but no place for Teddy to … er … do his business.

    Keri adds, “(The kitchen) is too well fitted in fact as there was no convenient nook for Teddy’s litter tray as there was in my last place.

    Taking Dee’s kitty litter hideaway as inspiration I decided to hack one of my Ikea Hol side tables.

    I bought a Projs desk pad and cut it down to fit inside the base of the Hol, so I could take it out and clean it to keep Teddy’s bathroom extra hygenic. Using a jigsaw, cut a doorway in the side of the Hol, and sanded down the edges so they are rounded. Also fitted hinges so make cleaning his tray out easier.

    I’m really pleased with the result. It’s not original, but I used a smaller Hol than Dee had used, as my shower room is small, and the Hol side table looks like a laundry basket.

    Before cutting the hole I’d checked Teddy was happy with using his tray inside a box by just using it on it’s side with no lid.

    By the way, when I was in Ikea this weekend I noticed that the Hol storage bench that Dee had used is back in stock, for £45. I know a few of your contributors have used it for some incredibly creative hacks, so thought your site visitors would like to know it is available again, in the UK at least!”

    What you can hack with a hol:
    Printer stand
    Dog crate
    Computer case
    Radiator cover
    HPTC box
    Subwoofer box


  • A cute catbox . . . finally!

    Krista joins the many Ikea hackers who finally found a cute solution to a messy problem. It is a more compact version of this PS litter box hack and offers a side entrance, instead of making kitty climb up through a hole in the floor of the cabinet. If you don’t have much space at home, this could be it.

    Krista says, “So here’s our solution – finally – to the litter box issue.

    First there is the question – where to put the litter box. Then, how to clean it easily.

    And can it be cute?
    Can we hide it in plain site?
    Without too much odor?

    It has taken us lots of moves, lots of trials and errors,and lots of hacking, but finally, we figured out a simple, convenient cat box solution that also fits our decor. Hooray!

    We used a PS cabinet on casters cut a entry hole in one side, sanded and taped the edges, and put a litter box inside.

    We and our 4 cats, are now quite happy.”

    Related hacks:
    Entryway cat litter and bench
    Flaren stealth litter box
    Quick and easy cat litter box
    Snack cat litter boxes
    Compact kitty box
    No pooper cat litter
    More pet hacks


  • Mondrian coffee table

    Lee had the idea for a long time but finally got round to designing and ordering supplies for the hack. Basically it is a Lack coffee table with a tile top. Quite a Mondrian, isn’t it?

    Related hacks:
    Mosaic Lack coffee table
    A touch of glass for the humble Lack side table
    Make mine a mosaic table


  • Another Bekvam

    This was done earlier, now, Elena does her version of the Bekvam.

    “The first one was simply painted, partly with stencil and partly free hand,then coated with varnish.

    The second one was a bit more complicated, I first started …


    with Ikea stencil but it didn’t work out too well, so I preferred covering it entirely with paper towels glued on it with “vernis-colle” (acrylic glue, becoming transparent when it dries, commonly used in the paper towel technique).

    As a finishing touch, I added some anti-slip band on the steps.”


  • Hackea: Lack bar cart

    This one’s for the green saint. Say cheers to this easy bar cart which you can put together in half an hour. Thanks to Typhanie.

    “I’m sure someone has done this hack before because it’s really easy but I’m still proud of what I did. This can be a bar cart or a bedside table.”

    The Lack side tables are attached with Liquid nails.  

    See more of Typhanie’s Lack bar cart.


  • Mikael unwired

    Beth gets the wires out of sight on her Mikael desk.

    She says, “I just did a nice little ikea hack and thought I would share. It’s involving the Mikael computer table on casters in the all white color. I was beyond tired of being able to see the nasty tangle of computer cords hanging down in the back. Cords are a necessary evil, yes, but still evil! So I decided to cover the back of the computer desk to hide them from view.


    I went to Lowe’s and bought a piece of precut wainscoting for $7.46. I then had it trimmed down to the right size (26″ tall by 29.5″ wide). Once I got home I realized I would have to cut out a panel so that my computer wouldn’t overheat. So I trimmed it 8.5″ from the top and 8.75″ from the right.

    Then I pre-drilled some holes in the corners and on the sides and nailed it on to the back of the computer desk. I also took off the top panel that came with the desk so that you can see the wainscoting throughout. Problem solved, you can’t see the ugly cords anymore! Plus it gives it a nice polished look, kind of mixing modern with traditional styles. All in all it took about 2 hours and cost less than $10.”


  • The many faces of Rickard

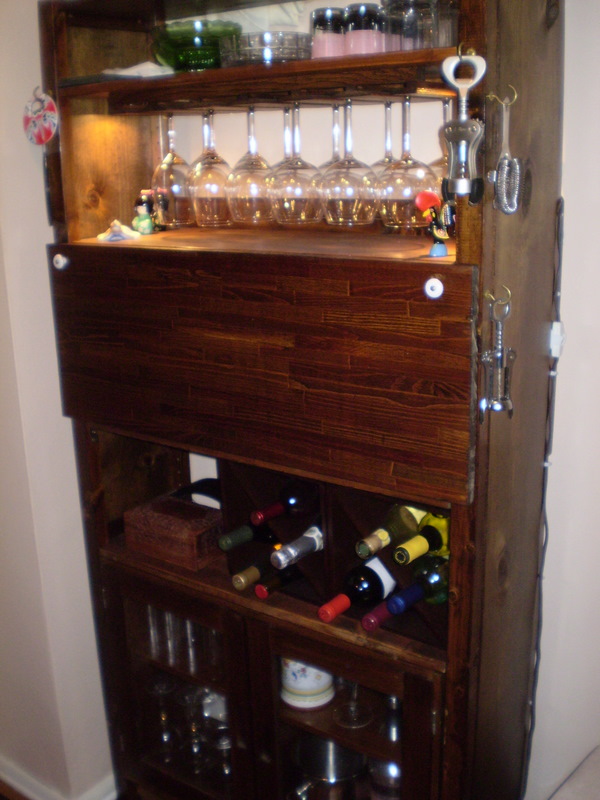
    Emily has been hard at work modding the Rickard chair for her thesis. I like Citizen Cane, a nice mix of old and new. Pretty solid ideas, I must say.

    She says, “I’ve been hacking away at the $19.99 Rickard task chair. I’m working on my MFA Design thesis exploring ways to extend the useful lives of task chairs, and how to create infrastructure to recover the parts for recycle at the end of the chair’s useful life. One big reason people chuck out this kind of chair is that they get bored of it, so to combat that I’ve been trying to breathe new life into them and make them fresh, pushing the limits of what a task chair can be.  Here are some pics of my hacks so far…

    Flower Child chair covered with Ikea’s own flower pattern fabric, embellished (by me) with hand embroidery.

    Citizen Cane chair with covers made with reclaimed caning from two old discarded chairs, and recycled wool felt. They’re removable, the back cover is held on with velcro and the seat cover slips on like a shower cap, with elastic around the bottom.  

    Wrap chair, this one’s just a piece of stretchy fabric pulled all the way over the chair with an elastic holding it around the waist.  When you sit, the fabric stretches to allow regular sitting but when you get back up, it bounces back into this shape. 

    The Maria, a play on the leather executive chair. For this one I increased the size of the back using foam-core that I taped onto the back, then covered the whole back in quilt batting and upholstered over it. The covers are made from recycled leather jackets – one maroon bomber jacket and one black leather trench coat. I kept the zipper and pockets of the bomber jacket and used them as a detail on the back of the chair. The pockets and zipper are still functional, so you can hide things in them. 

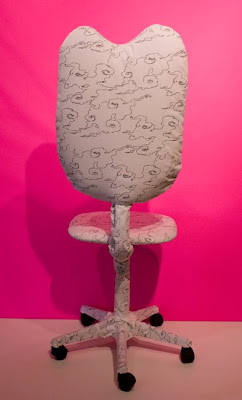
    This one’s named the Miyazaki, in honor of my favorite animator. For this one I again extended the back using foam-core taped onto the back, then padded it with quilt batting, and upholstered over it. The U-shape in the top is a neck cradle, so you can lean your head back into it, a little like when you’re getting a shampoo at the hair salon – only more comfortable and without getting wet. I covered the legs and cylinder base in matching fabric to add to the cartoon-ish quality. The fabric is from Ikea as well. 

    I’m currently working on a wingback version, stay tuned for that…”